Showing posts with label cake. Show all posts

Friday, September 27, 2013

Daring Bakers: Tres Leches Cake


Inma of la Galletika was our Sept. 2013 Daring Bakers’ hostess and WOW did she bring us something decadent and delicious! Pastel de Tres Leches or Three Milk Cake, creamy yet airy, super moist but not soggy.. just plain delish!

Tres Leches cake is something I have had many times, usually at a fancy restaurant, but I have never seen one that looks as incredible as Inma's version.  Any time I have had it, it is a fairly plain affair (not that it is not good plain), but Inma version adds fruit and hers was beautifully decorated.

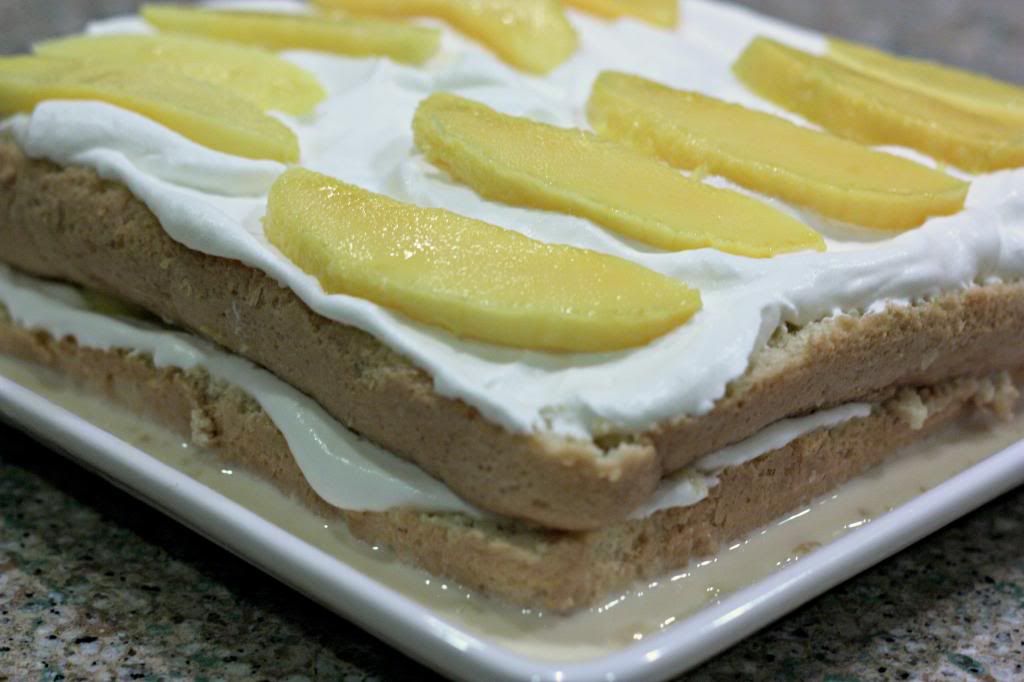
Inma had a chocolate coconut version of this recipe which sounded incredible, unfortunately I am the only coconut lover in the family so I decided to go for the standard version.  The cake is very easy to make.  The cake is a standard sponge cake, which I sometimes have a little trouble with, but this one came together perfectly.  The tres leche ( or three milk ) sauce was just as easy.  You wouldn't think canned milk could taste so good but combined with a little cream it made a very tasty sauce for the cake.

I have never tres leche with fruit but thought it might go nice with some mango, and I was right.  The cake was really good - as good as any I have had in a restaurant.  I like the cake plain but the mango was a wonderful addition.  The whole family loved the cake as you can see from the picture below :)


Wednesday, June 27, 2012

Daring Bakers: Battenberg Cake


This month Mandy of What The Fruitcake?! challenged us to make a  Battenberg Cake. She highlighted Mary Berry’s techniques and recipes to allow us to create this unique little cake with ease.  Well that was the idea anyway - mine was not exactly created with ease.

The first thing you might want to know is what is a Battenberg Cake?  I know I had no idea.  Well Mandy tells us this about the origins of the Battenberg Cake:

The first Battenberg cake was made to celebrate the marriage of Queen Victoria’s granddaughter, Princess Victoria, to husband Prince Louis of Battenberg. It’s traditionally flavored with almond and has the signature Battenberg markings, that is, the yellow and pink squares (said to represent the four princes of Battenberg).

Well Mandy's cakes looked gorgeous and I had high hopes of doing the same.  I had never worked with the marzipan that covers the cake before but I have done fondant cakes which are similar.  My first mistake was waiting too long.  I waited until two days before it was supposed to be done to try making the marzipan.  I tried doing a cooked marzipan recipe that Mandy provided for us.  It seemed easy enough but even when I had added all the liquid that it told us we might not need - the marzipan was still a crumbly, oily mess.

Well I posted on The Daring Kitchen website about my issues and Mandy came to the rescue.  She said I could just blend in a little more water, and if it got too wet I could add some more confectioners sugar.  I added the water and sure enough, I think I added too much.  Problem number 2 - I just ran out of confectioners sugar and I only have two hours before I have to get this done.  Quick cook the cake - no problems there.

Back to the marzipan.  I decided to make my own confectioners sugar.  I put a bunch of sugar in my food processor and process away.  Well I don't seem to be able to get it quite fine enough but I decide to use it anyway to help thicken the marzipan.  The marzipan gets better but I am sure it still wasn't right.  Just not firm enough to work with and it decides to stretch and tear when I try to cover the cake.
 
As for the results.  You can see from the picture it is not spectacular looking.  The marzipan is sagging and probably too thick.  The cake was marvelous - came out perfectly.  The marzipan tasted fabulous - just a tiny bit gritty from too course sugar I used.

This was a fun challenge but I sure need to allow myself more time for this kind of challenge.  I will definitely be taking another shot at marzipan sometime in the future.  If you would like to try making a Battenberg cake you can find the recipe I used along with others at The Daring Kitchen recipe archive.

Sunday, November 27, 2011

Daring Bakers: Filipino Deserts


This months Daring Bakers challenge is Filipino desserts.  The challenge listed two desserts from the Philippines - a cake called Sans Rival and a dessert called Bibingka.  The idea of making a Filipino dessert did appeal to me.  I went to the Philippines several years ago and loved it.   The people there are great and it was one of the best "food" countries I have been too.  They have a wonderful mix of different cultures foods along with their own.  I had a bunch of desserts their but I do not remember seeing either of these.  I wasn't too excited about the Sans Rival since it didn't really look like something I would like and I was thinking of making just the Bibingka - but the challenge said the Sans Rival was the mandatory part of the challenge.  November 14th was my wife's Birthday and the Sans Rival looked better to her that the Bibingka so I decided to go ahead and try it.

I think Sans Rival means without rival in French - kind of a big claim to make.  It is basically just a frosted cake, only layers of meringue are used instead of cake.  I made half a recipe and I also left the nuts out of the filling for my wife.  Other than the fact that it is a little tricky to frost half a round cake - the cake came together very easily.  I wasn't really expecting much from the Sans Rival but it was much better than I thought it would be.  The meringue cake held up well and provided a nice light contrast to the rich buttercream frosting.

I was really looking forward to trying the second dessert, the Bibingka.  As much as I was looking forward to it, I think my wife was the opposite - cheese in  dessert like this did not sound good to her.  The recipe had a few different choices for the topping of the dessert.  The salted egg (an egg left in saltwater at room temperature for several weeks) sounded interesting but I didn't really have time to make it and I was pretty sure if my wife didn't want the cheese there was zero percent chance of getting her to eat salted egg on top.  This was another easy dessert - only a couple of ingredients mixed together and cooked in a ramekin lined with a banana leaf.  The Bibingka was delicious and even my wife agreed.  I would describe it as a cake/custard.  It could be made without the banana leaf but the leaf does give it some flavor and makes for an elegant presentation.

Thanks to Catherine of Munchie Musings for this months Daring Bakers challenge.  If you are interested in either of these recipes you can find them at the Daring Bakers Recipe Archive.

Sunday, March 27, 2011

Daring Bakers: Mets la main à la pâte! Yeasted Meringue Coffee Cake


I had never really heard of a yeasted meringue coffee cake before. It didn't look like any coffee cake I had ever seen, but any cake with chocolate and nuts in it can't be that bad. We were given two different versions of a recipe, one was filled with pecans or walnuts, cinnamon, sugar, and chocolate. The other used cashews, sugar, garam masala, and chocolate. I kind of wish I tried the second version, it sounds good to me, but I decided to play it safe so that my wife would enjoy it more.

I made it using the first version of the recipe with no variations, and using pecans for the nuts. It went together easily. I was a little concerned with how hot the liquid was when I added it to the flour / yeast mixture - I thought it might kill the yeast - but it seemed to rise just fine.

The coffee cake was much different than any coffee cake I have had before. It is much more like a bread than a cake. It was very nice though - not very sweet at all - just a little bit. The chocolate, nuts, and cinnamon were there but they were much more subtle than in a more typical coffee cake. The actual "cake" part was like a moist, slightly sweet bread. I couldn't really tell what the meringue added - I expected to get more texture from it but I think the effect was much more subtle than I expected - I am sure it added to the sweetness though.

The recipe made two small rings (at least it was small compared to the Christmas Stollen we made). My family ate one of the rings and I sent the other to my wife's work where it got many favorable reviews.

This months challenge was presented by two bloggers this month - Jamie of Life's a Feast and Ria of Ria's Collection. If you would like to try to make this months challenge you can find the recipe in the Daring Kitchen Recipe Archive.

On a final housekeeping note I decided to try out Disqus for the blog commenting system. I think I like it but let me know if you like the old comment method better. This system will give the blog threaded comments and would let me respond directly to your comments.

Wednesday, October 20, 2010

Flancocho


I was never very good at Spanish in high school but I decided to give it another go and have been taking a community ed class in Spanish. It is still just as hard as I remember. Time will tell if I manage to learn enough Spanish to be valuable but I am having some fun in the class. Last week we had a lot of fun since we had a pot luck to celebrate Spanish heritage month.

I was one of the last ones to get to pick an item to bring so I was thrilled when desert was still available. I signed right up but was not sure what I was going to bring. My first thought was Tres Leches. The only deserts I really knew were tres leches and flan. After doing some research on the internet I found something called Flancocho which is a layer of cake and a layer of flan with the caramelized sugar on top. It said it was a Puerto Rican desert so I thought that it might be kind of cool to make since my teacher is from Puerto Rico.

The hard part turned out to be finding a good recipe. Most recipes were in Spanish and they varied a lot. Seems the traditional way to make it is on the stove in a double boiler, but there were also recipes that bake it using a water bath. Some recipes put a cooked cake in the raw flan then cook it, some crumble a cake into the flan and then cook it, and some put the raw cake batter on the raw flan and cook it. I saw cooking times anywhere from 30 minutes to 2 hours. Anyway, I combined what I thought would work with the equipment I had and I think it came out pretty good.

The cake was super moist and the flan was good and creamy with the caramel sugar on top. The teacher went back for seconds and I got a few compliments in class so I was not the only one who thought it was good. The teacher said she was not used to the flan with the cake so it must just be from certain regions or something.

Here is what I came up with:

Flancocho
Serves 12-15

Ingredients

For the caramel
  • 1 cup sugar
  • 1/4 cup water
For the flan layer
  • 1 12 ounce can evaporated milk
  • 1 14 ounce can sweetened condensed milk
  • 5 eggs
  • 1 teaspoon vanilla
  • 8 oz cream cheese, softened
For the cake layer
  • 1 yellow cake mix and ingredients for mix
Directions

  1. Heat oven to 350 degrees and place rack in middle of oven.
  2. Heat some water (about 8-10 cups) to boiling to use for the water bath.
  3. Mix the sugar and water together in a small microwave safe bowl. Heat in microwave on high until a light golden color (5-6 minutes). Do not allow it to get to dark or it will taste bitter. You can also heat on the stove. If you heat on the stove do not add the water. As soon as the caramel is cook pour it into a bundt pan and tip to coat all the sides as much as possible. It will start to harden immediately.
  4. In a medium bowl or standing mixer, mix all of the ingredients for the flan until well mixed, about 2 minutes.
  5. In another medium bowl prepare the cake mix as directed on the box.
  6. Pour the flan mixture into the bundt pan on top of the caramel. Pour the cake batter on top of the flan mixture (Don't worry - it will float).
  7. Place the bundt pan into a roasting pan or cake pan to use for the water bath - use the smallest tall sided pan you have that will fit the bundt pan. Pour the boiling water into the outer pan to go up the side of the bundt pan several inches.
  8. Place in the oven and cooking until a toothpick inserted in the cake layer comes out clean (60-70 minutes).
  9. Allow the cake to cool on the stove for about 15 minutes. Loosen the sides of the cake with a knife and allow to cool to room temperature. Flip the cake onto a deep serving platter. Cool in the refrigerator for at least 3 hours or overnight.

Friday, August 27, 2010

Ice Cream Petit Fours with Brown Butter Pound Cake


This months Daring Bakers Challenge was to make either Ice Cream Petit Fours or Baked Alaska. I wanted to make both and I was just discussing Baked Alaska with someone but I decided the Petit Fours would be much more practical. It is kind of hard to transport a Baked Alaska and I wanted to bring them to someone else's house for a dinner.

After seeing all the creativity in the Daring Bakers group last month I wanted to do at least something different. It is fun to see the different flavor combinations or other things (Baked Alaska on a Stick anyone?) that everyone does. I decided to keep it pretty simple and make a mint ice cream for mine. I just followed the same recipe except I steeped a few springs of mint leaves in the hot cream instead of the vanilla beans.

I think they turned out super. I have never had it before but turns out that brown butter pound cake is fantastic. I could have just eaten all the batter without cooking it - it tasted like butterscotch candy. The mint ice cream was good. My wife didn't like it even though she likes mint chocolate chip - but she is not a big fan of spearmint. Next time I should maybe try just adding some peppermint oil or something. Also if you want it to look like a store-bought mint you will need to add some coloring - it turned out very light green - I think it looked nice though.

These make a nice looking dessert. I decorated mine with Wilton Candy Melts (kinda like a white chocolate). I just stuck twenty or so of them in a piping bag and put them in the microwave for about 30 seconds. My three year old loved prying the decorations off the top of the petit fours and eating them. These are a fairly low-guilt dessert - not that they are healthy but they are small enough you don't have to feel too bad about eating one.

This months challenge was provided by Elissa at 17 and Baking. Check out her blog - fantastic cook, writer, and photographer and she is just 18 years old.

Wednesday, August 25, 2010

Barefoot Bloggers: Mixed Berry Cheesecake


If I had to pick my perfect desert it would probably be cheesecake. I have made a few cheesecakes in my day and haven't really had one I haven't liked (just keep the chocolate and caramel away from my cheesecake).

Looking at this cheesecake it seemed pretty normal to me. It didn't have cream like most others I have made. It also didn't need a water bath - I am all for that if it works. The other thing that seemed a little unusual was that they have you put the graham cracker crust 1 inch up - I kind of like the way it the crust looks this way.

This was definitely not the time of year for the berry topping - I think about a month late. The berries were all expensive and the strawberries needed a lot of picking through. I would say the cake was a good to average cheesecake. That is not a bad thing - even an average cheesecake is a very good desert - just not sure it was the best cheesecake I have ever had. It looked great and didn't even crack.

Thanks to Nathalie of Snowbell Jewelry for this month's pick.


Mixed Berry Cheesecake
Servers 12-15

Ingredients
For the crust:
  • 1 1/2 cups graham cracker crumbs (10 crackers)
  • 1 tablespoon sugar
  • 6 tablespoons (3/4 stick) unsalted butter, melted
For the filling:
  • 2 1/2 pounds cream cheese, at room temperature
  • 1 1/2 cups sugar
  • 5 whole extra-large eggs, at room temperature
  • 2 extra-large egg yolks, at room temperature
  • 1/4 cup sour cream
  • 1 tablespoon grated lemon zest (2 lemons)
  • 1 1/2 teaspoons pure vanilla extract
For the topping:
  • 1 cup red jelly (not jam) such as currant, raspberry, or strawberry
  • 1/2 pint sliced strawberries
  • 1/2 pint fresh raspberries
  • 1/2 pint fresh blueberries
Directions
  1. Preheat the oven to 350 degrees F.
  2. To make the crust, combine the graham crackers, sugar, and melted butter until moistened. Pour into a 9-inch springform pan. With your hands, press the crumbs into the bottom of the pan and about 1-inch up the sides. Bake for 8 minutes. Cool to room temperature.
  3. Raise the oven temperature to 450 degrees F.
  4. To make the filling, cream the cream cheese and sugar in the bowl of an electric mixer fitted with a paddle attachment on medium-high speed until light and fluffy, about 5 minutes. Reduce the speed of the mixer to medium and add the eggs and egg yolks, 2 at a time, mixing well. Scrape down the bowl and beater, as necessary. With the mixer on low, add the sour cream, lemon zest, and vanilla. Mix thoroughly and pour into the cooled crust.
  5. Bake for 15 minutes. Turn the oven temperature down to 225 degrees and bake for another 1 hour and 15 minutes. Turn the oven off and open the door wide. The cake will not be completely set in the center. Allow the cake to sit in the oven with the door open for 30 minutes. Take the cake out of the oven and allow it to sit at room temperature for another 2 to 3 hours, until completely cooled. Wrap and refrigerate overnight.
  6. Remove the cake from the springform pan by carefully running a hot knife around the outside of the cake. Leave the cake on the bottom of the springform pan for serving.
  7. To make the topping, melt the jelly in a small pan over low heat. In a bowl, toss berries and the warm jelly gently until well mixed. Arrange the berries on top of the cake. Refrigerate until ready to serve.

Friday, July 30, 2010

Blueberry Streusel Muffins


A little something different this month for the Barefoot Bloggers. We got to pick between two different Barefoot Contessa Blueberry Muffin recipes. We could either make her Blueberry Coffee Cake muffins or her Blueberry Struesel muffins. I decided to go for the struesel version because - well because there is struesel on them.

I had a bunch of blueberries in the freezer and almost used them but it is blueberry season and they were on sale very cheap so I decided to go for the fresh ones. I kind of doubt it makes much of a difference in muffins but might as well. The recipe went together very easily and the muffins were delicious. I could have used more struesel but maybe that is just me. The copy of the recipe I was using didn't say how many it made and I started it late at night so I currently have half the batter in the freezer and will probably attempt to make that in a day or two. I'll post a comment on how that goes.

Thanks to Maria of Close to Home for this pick. Looks like she one upped me by picking her own berries. I'll have to do that soon since I know my 3 year old would enjoy it. I'm hoping for less desert this month - as you can see from this months posts I have been eating too much of it.


Blueberry Streusel Muffins
(Source: Barefoot Contessa Back to Basics, page 244)
Makes about 24 muffins

Ingredients
  • 3 1/2 cups all-purpose flour
  • 1 1/2 cups granulated sugar
  • 4 1/2 tsp baking powder
  • 1 tsp baking soda
  • 1 tsp Kosher salt
  • 2 cups buttermilk, shaken
  • 1/4 lb (1 stick) unsalted butter, melted and cooled
  • 1 1/2 tsp grated lemon zest
  • 2 extra-large eggs
  • 2 cups fresh blueberries (2 half-pints)
For the Streusel Topping
  • 1/4 cup all-purpose flour
  • 1/2 cup light brown sugar, lightly packed
  • 1 tsp ground cinnamon
  • 1/4 tsp Kosher salt
  • 4 tbsp (1/2 stick) cold unsalted butter, diced
Directions
  1. Preheat the oven to 375 degrees F. Line muffin tins with paper liners.
  2. Sift the flour, sugar, baking powder, baking soda, and salt in to a large bowl and blend with your hands. In a separate bowl, whisk together the buttermilk, butter, lemon zest, and eggs. Stir the buttermilk mixture into the flour mixture with a fork, mixing just until blended. Fold the blueberries into the batter. Don’t overmix! With a standard (2 1/4″) ice cream scoop or large spoon, scoop the batter into the prepared cups, filling them almost full.
  3. For the topping, place all the ingredients in the bowl of a food processor fitted with the steel blade and pulse until the butter is in very small pieces. Pour into a bowl and rub with your fingers until crumbly. Spoon about 1 tbsp of the streusel on top of each muffin. Bake the muffins for 20 to 25 minutes, until golden brown.

Tuesday, July 27, 2010

Swiss Swirl Ice Cream Cake


I might be crazy but I have decided to try something new. I started this blog mainly as a way to force myself to do something a little challenging in the kitchen and to try some new things I might not try otherwise. I have been doing Barefoot Bloggers for a while now and have been able to try lots of new things with that but I have always wanted to try a more dessert focused challenge. I have decided that Daring Bakers is the right challenge for me. It is only once a month so it won't give us too many extra calories and a lot of the recipes look like they might end up being quite challenging. A lot of the challenges give a lot of room for creativity - we will see how I do with that since I normally have a hard time doing much different than the recipe.

At least for this first month I am not being particularly creative or "daring". I can already see a lot of the other bakers with very unique flavor combinations (Chili chocolate fudge Swiss swirl cake with sour cherry, coffee ice cream, pistachio nut butter ice cream, and vanilla ice cream or prickly pear, boiled chocolate treacle and vanilla sugar swiss rolls with Mixed Berries ice cream, saffron ice cream, honey and candied fig ice cream, and blue champagne ice cream). I am pretty sure you are never going to see that kind of creativity coming from me.

The idea for this recipe challenge came from the Taste of Home magazine. The recipe was very simple - you just stick together swiss cake rolls with ice cream and hot fudge. Our hostess Sunita made this into much more of a challenge since for Daring Bakers we had to make all the components.

I did decide to change things up slightly. In Sunita's version the ice cream recipes were nothing like ice cream recipes I am used to. They were both very simple and contained no eggs and you did not cook them. I decided to make the vanilla using Sunita's recipe but I made a more traditional chocolate where you cook a custard and freeze that for the ice cream - that way I could compare the very quick and easy version with a more traditional ice cream.

The recipe was not very hard, except maybe getting the swiss cake rolls to not fall apart while putting them in the bowl. It did take a lot of time though making it. I took a little over one day putting it together and freezing all the layers. For some reason the hot fudge layer took forever to freeze. I used the cake at a forth of July party and everyone loved it. It looked fantastic too. As far my ice cream experiment goes - I think the traditional ice cream was the winner but the quick version wasn't bad at all. Was kind of interesting that on the one piece that wasn't finished the vanilla ice cream didn't seem to ever melt but the chocolate sure did.

Thanks to Sunita at Sunita's World for being this months hostess. She has a beautiful blog with a lot of good looking stuff to try.


Swiss roll ice cream cake (inspired by the recipe of the same name from the Taste of Home website)

The Swiss rolls-

Preparation time- 10 minutes
Baking time- 10-12 minutes
Rolling and cooling time- at least 30 minutes
Filling-5-8 minutes
Filling and rolling- 5-10 minutes

Ingredients
  • 6 medium sized eggs
  • 1 C / 225 gms caster sugar /8 oz+ extra for rolling
  • 6 tblsp / 45gms/ a pinch over 1.5 oz of all purpose (plain) flour + 5 tblsp/40gm /a pinch under 1.5 oz of natural unsweetened cocoa powder, sifted together
  • 2 tblsp /30ml / 1 fl oz of boiling water
  • a little oil for brushing the pans
For the filling
  • 2C / 500 mls/ 16 fl oz of whipping cream
  • 1 vanilla pod, cut into small pieces of about ½ cm (or 1 tsp vanilla extract)
  • 5 tblsp / 70gms/2.5oz of caster sugar
Directions
  1. Pre heat the oven at 200 deg C /400 deg F approximately. Brush the baking pans ( 11 inches by 9 inches ) with a little oil and line with greaseproof baking paper. If you have just one pan, bake one cake and then let the pan cool completely before using it for the next cake.
  2. In a large mixing bowl, add the eggs and sugar and beat till very thick; when the beaters are lifted, it should leave a trail on the surface for at least 10 seconds.
  3. Add the flour mixture, in three batches and fold in gently with a spatula. Fold in the water.
  4. Divide the mixture among the two baking pans and spread it out evenly, into the corners of the pans.
  5. Place a pan in the centre of the pre heated oven and bake for about 10-12 minutes or till the centre is springy to the touch.
  6. Spread a kitchen towel on the counter and sprinkle a little caster sugar over it.
  7. Turn the cake on to the towel and peel away the baking paper. Trim any crisp edges.
  8. Starting from one of the shorter sides, start to make a roll with the towel going inside. Cool the wrapped roll on a rack, seam side down.
  9. Repeat the same for the next cake as well.
  10. Grind together the vanilla pieces and sugar in a food processer till nicely mixed together. If you are using vanilla extract, just grind the sugar on its own and then add the sugar and extract to the cream.
  11. In a large bowl, add the cream and vanilla-sugar mixture and beat till very thick.
  12. Divide the cream mixture between the completely cooled cakes.
  13. Open the rolls and spread the cream mixture, making sure it does not go right to the edges (a border of ½ an inch should be fine).
  14. Roll the cakes up again, this time without the towel. Wrap in plastic wrap and chill in the fridge till needed, seam side down.

The vanilla ice cream-

Preparation time-5 minutes+freezing

I have made the ice cream without an ice cream maker.

Ingredients
  • 2 and ½ C / 625 ml / 20 fl oz of whipping cream
  • 1 vanilla bean, minced or 1 tsp/ 5 ml/ .15 fl oz vanilla extract
  • ½ C / 115gms/ 4 oz of granulated sugar
Directions
  1. Grind together the sugar and vanilla in a food processor. In a mixing bowl, add the cream and vanilla –sugar mixture and whisk lightly till everything is mixed together. If you are using the vanilla extract, grind the sugar on its own and then and the sugar along with the vanilla extract to the cream.
  2. Pour into a freezer friendly container and freeze till firm around the edges. Remove from the freezer, beat till smooth and return to the freezer. Do this 3-4 times and then set completely.

The Hot fudge sauce-

Preparation time-2 minutes
Cooking time-2 minutes

Ingredients-
  • 1 C / 230gms/ 8 oz of caster sugar
  • 3 tblsp / 24gms/1.5 oz of natural unsweetened cocoa powder
  • 2 tblsp /15gms/ 1 oz of cornflour/cornstarch
  • 1 and ½ C /355ml /12 fl oz of water
  • 1 tblsp /14gms/ 1 oz butter
  • 1 tsp/5 ml / .15 fl oz vanilla extract
Directions
  1. In a small saucepan, whisk together the sugar, cocoa powder, cornflour and water.
  2. Place the pan over heat, and stir constantly, till it begins to thicken and is smooth (for about 2 minutes).
  3. Remove from heat and mix in the butter and vanilla. Keep aside to cool .

The chocolate ice cream-

Preparation time- 5 minutes + freezing

Ingredients
  • 2C/ 500 ml whipping cream
  • 1 C/230gms/8 oz caster sugar
  • 3 tblsp/ 24 gms/1.5 oz of natural unsweetened cocoa powder
Directions
  1. Grind together the sugar and the cocoa powder in a food processor .
  2. In a saucepan, add all the ingredients and whisk lightly.
  3. Place the pan over heat and keep stirring till it begins to bubble around the edges.
  4. Remove from heat and cool completely before transferring to a freezer friendly container till firm around the edges. If you are using an ice cream maker, churn the ice cream according to the manufacturer’s instruction, after the mixture has cooled completely.
  5. Remove from the freezer, beat till smooth and return to the freezer. Do this 3-4 times and then set completely.
Assembly-

  1. Cut the Swiss rolls into 20 equal slices ( approximately 2 cms each ).
  2. Cover the bottom and sides of the bowl in which you are going to set the dessert with cling film/plastic wrap.
  3. Arrange two slices at the bottom of the pan, with their seam sides facing each other. Arrange the Swiss roll slices up the bowl, with the seam sides facing away from the bottom, to cover the sides of the bowl. Cover the bowl with plastic wrap and freeze till the slices are firm (at least 30 minutes).
  4. Soften the vanilla ice cream. Take the bowl out of the freezer, remove the cling film cover and add the ice cream on top of the cake slices. Spread it out to cover the bottom and sides of the bowl. Cover the bowl with plastic wrap and freeze till firm ( at least 1 hour)
  5. Add the fudge sauce over the vanilla ice cream, cover and freeze till firm . ( at least an hour)
  6. Soften the chocolate ice cream and spread it over the fudge sauce. Cover with plastic wrap and freeze for at least 4-5 hours till completely set .
  7. Remove the plastic cover, and place the serving plate on top of the bowl. Turn it upside down and remove the bowl and the plastic lining. If the bowl does not come away easily, wipe the outsides of the bowl with a kitchen towel dampened with hot water. The bowl will come away easily.
  8. Keep the cake out of the freezer for at least 10 minutes before slicing, depending on how hot your region is. Slice with a sharp knife, dipped in hot water.

Sunday, July 25, 2010

Happy 3rd Birthday Victor!


I know everyone says how fast they grow up but it is true. Victor's third birthday was on July 22nd and we had his party on Saturday at one of the local parks. One of his favorite TV shows right now is Mickey Mouse Clubhouse so I decided to attempt a cake using that as the theme. Everything you see here - except for the candles is edible and made with a marshmallow fondant. It was a fun time and Victor enjoyed himself very much. It totally makes the hard work of making a cake like that worth it when you get that kind of smile back.


Wednesday, June 30, 2010

Barefoot Bloggers: Sour Cream Coffee Cake


I think this is my fourth post in less than a week - a lot for me. Even though our leader over at Barefoot Bloggers gave us ever time to get our cooking done over the summer I still almost didn't make it on this one. Looked too good to pass up though and it is always easy to get rid of some coffee cake at my wife's work.

I made one mistake while making this recipe. I bought a Nordic Ware Bavaria Bundt Pan a few years ago. This is not something I would normally but without having a use for it but it was at our company store for less that $10 so I couldn't pass it up. After buying it, it has sat in our cupboard ever since. When this recipe came up I figure it was my perfect opportunity to try my pan.

It is a beautiful pan, heavy cast-aluminum with a nice design and a non-stick finish. I figured out there was one issue when I got to the part where I put the batter in the pan and it says to do half batter, half streusel, half batter, half streusel. When the cake is done it wants you to flip it out streusel side (or bottom side) up. I can't really display a cake from this pan bottom side up. I wasn't sure if it would work to put the streusel in first so I made a little but of a sacrifice and decided to have both streusel layers inside the cake - this means I don't have a nice streusel topping. My second issue came in plating the cake. The pan, even with non-stick finish ( oiled and floured ) did not want to let go of the cake. You can see in the picture above that I lost a small layer on the top of the cake. Not sure if a different cake would work out better or not.

Despite my issues, the cake was a big winner. I sent a bunch of it to my wife's work and got these comments back:

"Yum! It was awesome!"

"I think it was your husband's best cake to date, but then again I'm not much of a cake and frosting guy. This was coffee cake? Superb!"

I would have to agree that it was really good. Very moist and good flavor. I especially like the hint of maple flavor from the glaze - I love maple anything.

Thanks to Gwenn of Cooking in Pajamas for this pick. Check out the picture of her Sour Cream Coffee cake - that is what it is supposed to look like.


Sour Cream Coffee Cake
(Source: Barefoot Contessa Parties!, Page 37)
Yields 8-10 servings

Ingredients
  • 12 tablespoons (1 1/2 sticks) unsalted butter at room temperature
  • 1 1/2 cups granulated sugar
  • 3 extra-large eggs at room temperature
  • 1 1/2 teaspoons pure vanilla extract
  • 1 1/4 cups sour cream
  • 2 1/2 cups cake flour (not self-rising)
  • 2 teaspoons baking powder
  • 1/2 teaspoon baking soda
  • 1/2 teaspoon kosher salt
For the streusel:
  • 1/4 cup light brown sugar, packed
  • 1/2 cup all-purpose flour
  • 1 1/2 teaspoons ground cinnamon
  • 1/4 teaspoon kosher salt
  • 3 tablespoons cold unsalted butter, cut into pieces
  • 3/4 cup chopped walnuts, optional
For the glaze:
  • 1/2 cup confectioners' sugar
  • 2 tablespoons real maple syrup
Directions
  1. Preheat the oven to 350 degrees F. Grease and flour a 10-inch tube pan.
  2. Cream the butter and sugar in the bowl of an electric mixer fitted with the paddle attachment for 4 to 5 minutes, until light. Add the eggs 1 at a time, then add the vanilla and sour cream. In a separate bowl, sift together the flour, baking powder, baking soda, and salt. With the mixer on low, add the flour mixture to the batter until just combined. Finish stirring with a spatula to be sure the batter is completely mixed.
  3. For the streusel, place the brown sugar, flour, cinnamon, salt, and butter in a bowl and pinch together with your fingers until it forms a crumble. Mix in the walnuts, if desired.
  4. Spoon half the batter into the pan and spread it out with a knife. Sprinkle with 3/4 cup streusel. Spoon the rest of the batter in the pan, spread it out, and scatter the remaining streusel on top. Bake for 50 to 60 minutes, until a cake tester comes out clean.
  5. Let cool on a wire rack for at least 30 minutes. Carefully transfer the cake, streusel side up, onto a serving plate. Whisk the confectioners' sugar and maple syrup together, adding a few drops of water if necessary, to make the glaze runny. Drizzle as much as you like over the cake with a fork or spoon.

Thursday, February 11, 2010

Barefoot Bloggers: Coconut Cupcakes


When I saw this months recipes I thought - Oh great, two more recipes my wife won't eat. Normally I don't make the ones that only I will eat but I changed that rule for these. I have never really been a big cake person but coconut cake is one that I have a hard time passing up. I think it goes back to childhood memories when my grandmother would make a cake every year for my grandfather's birthday. The cake was always half coconut and half banana and I remember liking both halves.

So I decided to make these. It makes way more cupcakes than I will eat but it is not like it is that hard to get rid of cupcakes. I passed out a bunch at a meeting tonight and I will send whatever else I don't want to eat to my wife's work tomorrow - they won't last long there.

These cupcakes weren't much like my grandmothers cake but they were delicious. There is coconut in the cake so there is lots of coconut flavor. I loved the cream cheese frosting too - just like on a good carrot cake. As you can see my son had to use every ounce of his self control to keep from sticking his finger in a cupcake - I did let him lick the beater though. At lunchtime he told me "full ravioli, hungry cupcake".

Thanks to Jamie at Jamie's Green Kitchen for this pick. Looking at her blog it looks like she really, really, really likes cupcakes - I can see why she picked this recipe.

Coconut Cupcakes
Yield: 18 to 20 cupcakes

Ingredients
  • 3/4 pound (3 sticks) unsalted butter, room temperature
  • 2 cups sugar
  • 5 extra-large eggs at room temperature
  • 1 1/2 teaspoons pure vanilla extract
  • 1 1/2 teaspoons pure almond extract
  • 3 cups flour
  • 1 teaspoon baking powder
  • 1/2 teaspoon baking soda
  • 1/2 teaspoon kosher salt
  • 1 cup buttermilk
  • 14 ounces sweetened, shredded coconut
For the frosting:
  • 1 pound cream cheese at room temperature
  • 3/4 pound (3 sticks) unsalted butter, room temperature
  • 1 teaspoon pure vanilla extract
  • 1/2 teaspoon pure almond extract
  • 1 1/2 pounds confectioners' sugar, sifted
Directions
  1. Preheat the oven to 325 degrees F.
  2. In the bowl of an electric mixer fitted with the paddle attachment, cream the butter and sugar on high speed until light and fluffy, about 5 minutes. With the mixer on low speed, add the eggs, 1 at a time, scraping down the bowl after each addition. Add the vanilla and almond extracts and mix well.
  3. In a separate bowl, sift together the flour, baking powder, baking soda, and salt. In 3 parts, alternately add the dry ingredients and the buttermilk to the batter, beginning and ending with the dry. Mix until just combined. Fold in 7 ounces of coconut.
  4. Line a muffin pan with paper liners. Fill each liner to the top with batter. Bake for 25 to 35 minutes, until the tops are brown and a toothpick comes out clean. Allow to cool in the pan for 15 minutes. Remove to a baking rack and cool completely.
  5. Meanwhile, make the frosting. In the bowl of an electric mixer fitted with the paddle attachment, on low speed, cream together the cream cheese, butter, and vanilla and almond extracts. Add the confectioners' sugar and mix until smooth.
  6. Frost the cupcakes and sprinkle with the remaining coconut.

Thursday, September 24, 2009

Barefoot Bloggers: Beatty’s Chocolate Cake


Are you guys sick of cake yet? I have liked making and tasting these cakes - it has been nice to be able to compare so many recipes so I will hopefully have one that I want to use when I really need a good cake. The last cake was a yellow cake - now onto a chocolate cake.

This recipe seemed very different to me. It is kind of surprising how different recipes can be and still make the same basic thing. The recipe uses a lot of liquid for the amount of solid ingredients and the batter is very runny. I re-read the recipe a few times to make sure I didn't screw up. It was the complete opposite of the last cake I made which had to be spread into the pans.

I had a few disasters while making this cake. My buttermilk was bad so I ended up using some of the dry buttermilk substitute I had. I was a little concerned about this - I don't like making a substitution like this on a cake. My second problem occurred ten minutes into baking. The cake started overflowing like crazy. This one could have been prevented if only I had read the recipe comments on food network. There were a lot of people that had this issue. Sounds like the way to fix this is to either use a 9 inch pan instead of the 8 inch pans or to use a deeper 8 inch pan. I slipped a pan in quick to catch the mess but not quick enough - I have a big mess to clean up now.

Despite the overflow the cake was fantastic. I had to trim the cake a little because of the overflow and it ended up being very crumby and hard to frost. The frosting recipe didn't make any extra so that didn't help either. You can see a few of the crumbs peeking through in my cake but it wasn't to bad. The cake was very moist and chocolaty. The coffee flavor didn't really come through in the cake but it did in the frosting. I am not a coffee drinker but I still liked it in this. My wife and at least one other person didn't like the frosting because of the coffee so keep this in mind if you are serving it to non-coffee drinkers. You could always reduce or eliminate the coffee in the frosting. The frosting had a very good texture and was not too sweet - it went very nicely with the cake. I will definitely use this recipe again.

Thanks to Mary at Passionate Perseverance for this recipe. Her blog is one of the first barefoot blogger blogs I have seen that is not predominantly a food blog. Looks like she has a lot of different topics she blogs on.


Beatty's Chocolate Cake
Serves 8

Ingredients
  • Butter, for greasing the pans
  • 1 3/4 cups all-purpose flour, plus more for pans
  • 2 cups sugar
  • 3/4 cups good cocoa powder
  • 2 teaspoons baking soda
  • 1 teaspoon baking powder
  • 1 teaspoon kosher salt
  • 1 cup buttermilk, shaken
  • 1/2 cup vegetable oil
  • 2 extra-large eggs, at room temperature
  • 1 teaspoon pure vanilla extract
  • 1 cup freshly brewed hot coffee
Directions (Chocolate Buttercream recipe follows)
  1. Preheat the oven to 350 degrees F. Butter 2 8-inch (use deep 8 inch or 9 inch pans) round cake pans. Line with parchment paper, then butter and flour the pans.
  2. Sift the flour, sugar, cocoa, baking soda, baking powder, and salt into the bowl of an electric mixer fitted with a paddle attachment and mix on low speed until combined. In another bowl, combine the buttermilk, oil, eggs, and vanilla. With the mixer on low speed, slowly add the wet ingredients to the dry. With mixer still on low, add the coffee and stir just to combine, scraping the bottom of the bowl with a rubber spatula. Pour the batter into the prepared pans and bake for 35 to 40 minutes, until a cake tester comes out clean. Cool in the pans for 30 minutes, then turn them out onto a cooling rack and cool completely.
  3. Place 1 layer, flat side up, on a flat plate or cake pedestal. With a knife or offset spatula, spread the top with frosting. Place the second layer on top, rounded side up, and spread the frosting evenly on the top and sides of the cake.

Chocolate Frosting

Ingredients
  • 6 ounces good semisweet chocolate (recommended: Callebaut)
  • 1/2 pound (2 sticks) unsalted butter, at room temperature
  • 1 extra-large egg yolk, at room temperature
  • 1 teaspoon pure vanilla extract
  • 1 1/4 cups sifted confectioners' sugar
  • 1 tablespoon instant coffee powder
Directions
  1. Chop the chocolate and place it in a heat-proof bowl set over a pan of simmering water. Stir until just melted and set aside until cooled to room temperature.
  2. In the bowl of an electric mixer fitted with a paddle attachment, beat the butter on medium-high speed until light yellow and fluffy, about 3 minutes. Add the egg yolk and vanilla and continue beating for 3 minutes. Turn the mixer to low, gradually add the confectioners' sugar, then beat at medium speed, scraping down the bowl as necessary, until smooth and creamy. Dissolve the coffee powder in 2 teaspoons of the hottest tap water. On low speed, add the chocolate and coffee to the butter mixture and mix until blended. Don't whip! Spread immediately on the cooled cake.

Sunday, September 13, 2009

Barefoot Bloggers: Birthday Sheet Cake


A little late on this on but better late than never. As I mentioned in my last post I actually had an event I could use a sheet cake at. The last cake I made I wanted to rent the pan since I figured I would probably never make a large cake like this again - imagine my surprise when I was making one just a month later.

The event was a Reunion picnic for the Rev-Elations chapter of the Christian Motorcycle Association. It is the first time they tried this and I wanted to try to make it a little more special with the cake. The frosting job was a little difficult. As you can see a lot of writing in not a lot of space - I think my hand is still cramping up from doing the lettering. I think the frosting job came out pretty good though. The event was also a big success - lots of good food and good times with all the past and current members. If you want to know more about the Christian Motorcycle Association and what we do please check out this link.

Now on to the cake. I was a little worried after reading all the food network reviews. It has the lowest rating of he recipes that I have seen. People didn't like the lemon, the cake was dry, it overflowed... Well a lot of the problems seemed to be with people adjusting the cake for a different size pan - this can be difficult if you don't know what you are doing. I like citrus so I decided to leave that as well. I am not sure I have ever made a cake with sour cream or corn starch as ingredients. This would defintly be an experiment.

The cake was very good. It was very moist (dry usually means overcooked which doesn't take long with a cake) and it was a sweet cake. The citrus was noticeable but not overwhelming at all. The frosting was thin which made me a little nervous. The recipe wanted it frosted in the pan - informal like - which is not what I did. My cake was cold when I frosted it and the icing set right up when it hit the cold cake so it worked out well. The frosting was very chocolaty and not too sweet. I think this was a nice combo with the sweet cake. My wife liked the lemon too and even thought it might need more since it was hard to taste with the frosting. Overall I really enjoyed it and it is a recipe I would make again. Reading comments on food network and the other blogs I might be in the minority though.

Thanks to Susy of Everyday Gourmet for this recipe. She ended up making two separate double layer 9 inch cakes instead of the sheet cake. Check out her blog to see how she changed the second cake up a little. Looks yummy.

Birthday Sheet Cake
Makes 1 12x18 inch cake

Ingredients
For the cake:
  • 18 tablespoons (2 1/4 sticks) unsalted butter, at room temperature
  • 3 cups sugar
  • 6 extra-large eggs, at room temperature
  • 8 ounces (about 1 cup) sour cream, at room temperature
  • 1 1/2 teaspoons pure vanilla extract
  • 1 lemon, zested
  • 3 cups all-purpose flour
  • 1/3 cup cornstarch
  • 1 teaspoon kosher salt
  • 1 teaspoon baking soda
For the frosting:
  • 24 ounces semisweet chocolate chips
  • 1 1/2 cups heavy cream
  • 2 tablespoons light corn syrup
  • 1/2 teaspoon pure vanilla extract
  • 4 tablespoons (1/2 stick) unsalted butter, at room temperature
  • Chocolate candies for decorating (recommended: M&M's)
Directions
  1. Preheat the oven to 350 degrees F. Butter and flour a 12 by 18 by 1 1/2-inch sheet pan.
  2. To make the cake, cream the butter and sugar on medium-high speed in the bowl of an electric mixer fitted with a paddle attachment until light and fluffy, about 5 minutes. On medium speed, add the eggs, 2 at a time, then the sour cream, vanilla, and lemon zest, scraping down the bowl as needed. Mix well. Sift together the flour, cornstarch, salt, and baking soda. With the mixer on low speed, slowly add the flour mixture to the butter mixture and stir just until smooth. Finish mixing by hand to be sure the batter is well mixed. Pour evenly into the pan, smooth the top with a spatula, and bake in the center of the oven for 25 to 30 minutes, or until a toothpick comes out clean. Cool in the pan to room temperature.
  3. For the frosting, place the chocolate chips and heavy cream in a bowl set over a pot of simmering water, stirring occasionally, until the chips are completely melted. Off the heat, add the corn syrup and vanilla and allow the chocolate mixture to cool to room temperature. In the bowl of an electric mixer fitted with the whisk attachment, whisk the chocolate mixture and softened butter on medium speed for a few minutes, until it's thickened.
  4. Spread the frosting evenly on the cake. Have the children decorate the cake with chocolate candies.

Wednesday, September 9, 2009

Cakes, cakes, cakes


Are you guys sick of cakes yet? I hope not because I'm not done with them yet. Today is the due date for Barefoot Bloggers but this is not my Barefoot Bloggers post. The Barefoot Blogger recipe is for a cake. And not for just any cake, it is for a half sheet cake. Well I actually have some stuff going on later this week where I could actually use a sheet cake so I am going to cheat a little and delay my post until then.

To hold you over until then here is another cake I recently made. My wife had a friend at work that recently got married and she wanted to have a party for them. I decided I could make the cake. There is a lot of pressure when you are making a cake from someone else and I was a little nervous about this one. For one thing my wife told me that Mohamed has a lot of friends so there would be somewhere between 50-100 people. Every site I found seems to have a different guideline to how much cake I needed for that many people. I decided to make a two layer half sheet which is my biggest cake yet. I was a little worried with how hard it would be to work with a cake of this size.

Mohamed and Gianna said they wanted a marble cake and the colors were purple and silver. I decided to do a cake similar to one in my fondant class that I liked. It used a lot of gum paste daisies ( 40 small, 12 medium, and 4 large). I spent a couple of hours over two nights making the daisies and playing with the design.

I have been making all scratch cakes but I decided for this one to use a mix to make at least part of this a little easier. Since I don't really make boxed cakes I wasn't prepared for how much it was going to rise. I filled the pan less than half full and it was over the top when it was done. I'll know better next time.

One thing I have never been successful at was using a real butter cream frosting. I decided this was the occasion to try again. I figured if it wasn't working out I could quickly make the "Wilton" butter cream recipe. It came out fantastic and wasn't too difficult to work with. It did get a little hard to work with when it started to get warm but I would just chill it for a little bit and it would be fine again. I can say it was definitely worth it. It was much better than the "Wilton" Crisco butter cream recipe. It melted in your mouth and tasted much better in my opinion.

The project was a big success. Everyone liked the cake and they liked the fabulous punch my wife made. I have to admit I liked the boxed cake better than the scratch cakes I have been making. I am very interested to see how the Barefoot Blogger cakes come out and see if they can beat the box for me. Stay tuned!

Saturday, August 22, 2009

Happy 2nd Birthday Victor!


Its been a month since Victor's Birthday so I figure it is about time to get this posted. This was the main reason why I took my cake decorating classes - so I could make a semi-decent birthday cake for my son. Victor is quite a fan of Elmo. Even before he watched Sesame street I would let him see the Elmo toy at Target and he fell in love with it. This birthday did not disappoint him - he got Elmo cake, plates, cards and gifts. I decided not to go with the Elmo pan and did a quarter sheet instead. I found and Elmo pic online and used that for my pattern.


Sunday, June 28, 2009

My first "real" cake


This past Sunday was Father's day and we took the opportunity to also celebrate my wife's brother's (Mark) birthday. I decided to practice some of my new cake knowledge on the family and give me a little practice before I have to make my son Victor's birthday cake in July.
I didn't know what Mark's favorite Disney character was so I had to come up with something else. Mark is a union pipe fitter. I didn't know exactly what a pipe fitter looked like on the job but you can see what I came up with. The grey/black border to the cake is supposed to be pipe. The little guy has a welding mask and is holding a candle as a makeshift welding torch.
The cake was a yellow cake and it turned out a lot better than the past few cakes I had made. I was almost ready to turn to a box cake after the past two scratch cakes I made. I filled the cake with a fresh strawberry french cream. The frosting is all the Wilton buttercream recipe only with a lot less Crisco and a lot more butter ( not as pure white but it taste better). The welder and tank were made from a fondant/gum paste mix. Doesn't look like an Ace of Cakes cake but I was very happy with how it came out. I think it looked pretty good and it tasted good as well - especially the strawberry cream.

Sunday, June 21, 2009

Wilton Fondant Class: Final Cake

Well here it is - the final cake for my Wilton Fondant class. As a lot of people know fondant is not the most delicious frosting. It looks better than it tastes. In the class we were told to buy the pre-made Wilton fondant. For my final cake I thought I would try to do something different to see if I could make a fondant cake that I liked. If you look there are a lot of different fondants you can buy or make. The class instructor said making fondant was a lot of work but I found a recipe online that didn't seem too difficult. You just melt marshmallows and knead in a lot of confectioners sugar.


You can see the final outcome in the cake above. The homemade fondant was probably a little harder to work with - a little "stretchier" than the store bought Wilton fondant - but it was still pretty easy to use. I can't say it was easy to make. If you have ever mixed rice crispy squares by hand you know how messy it can get kneading melted marshmallows. I would have to say it
was worth it though. The fondant tasted a little better in my opinion, basically straight sugar taste so still not as good as some other frostings. It was a lot more tender than the store bought so you didn't feel like you needed to chew your frosting as much.

I've also got some photos of different gum paste items we made in class. I kind of doubt most of these will come in handy making
birthday cakes for my son but maybe I will get to use them someday. For anyone thinking they would like to get a little better at cake decorating I would highly recommend these classes. There are four separate classes (I have only taken two) and they are offered at Michaels and Joann stores here. I think you can find local classes at the wilton.com site.
.

Thursday, June 4, 2009

Wilton Fondant Class: FrankenCake


I took the Wilton I course a couple of months ago and it was a lot of fun so I decided it was time for a little more. I decided to check out the fondant and gum paste class. Fondant is the stuff they make a lot of wedding cakes out of and it is the stuff they use to make those perfect cakes on Ace of Cakes if you have ever seen that.

In the class you use rolled fondant and gum paste (or a mix of the two) for everything. Rolled Fondant is stiff and you can mold it or roll it out. Gum paste is the same but a little stronger and dries hard as a rock in a couple of days. The cake above is one that I made in the second week of class. It is a bit of a franken cake - it was more just to practice technique than to make a pretty cake. The blue covering for the cake is fondant and the embellishments are a 50/50 mix of fondant and gum paste. It is the gum paste that makes it stiff enough to let you do things like the draped sheet look in the above cake.

One thing the class makes you realize is that you would never want to make a cake like this. A lot of people don't really like fondant. It is not that it taste bad - it is mostly just sugar. It does have a stiff, chewy texture which I don't think is real pleasing on a cake.

A major reason I am taking these classes is because of my 22 month old son. I am going to be making a lot of birthday cakes in the future. I probably won't make any fondant covered cakes but I may be using some fondant/ gum paste to make little animals or people or whatever. Plus, I assume kids may not care that the texture is not great for frosting if it has enough sugar in it!

Watch next week for my final cake of this class.

Tuesday, March 17, 2009

Wilton Cake Class 1 - Part 2


Tonight we made our second cake in cake decorating class.  This week we learned how to make a few flowers (no roses yet), a new border, faces, hearts, fruit, and clowns.  It is getting a little harder but so far nothing is too difficult - I think that may change with the rose next week.  For my cake this week I made a chocolate - I was a little worried because it is obvious if you mess up frosting with chocolate since you can see the crumbs.  The flowers are just called swirl flowers since you have to twist your wrist when making it.  So what do you think - I think it came out pretty good.