Showing posts with label daring bakers. Show all posts

Friday, June 27, 2014

Daring Bakers: Cinnamon Rolls


This month the Daring Bakers kept our creativity rolling with cinnamon bun inspired treats. Shelley from C Mom Cook dared us to create our own dough and fill it with any filling we wanted to craft tasty rolled treats, cinnamon not required!

It has been forever since I have managed to do a Daring Kitchen challenge, and even longer since I have managed to post about it.  Well looks like Cinnamon rolls were enough to get me out of retirement.  When I first saw the challenge I was pretty sure I was just going to make your standard cinnamon rolls - nothing fancy.  Then I saw all the delicious looking variations and decided on the roasted banana cinnamon rolls with maple glaze. 

They went together very easily - the banana's roast while you are letting the dough rise on top of the stove.  I only had two issues:

1 - My daring twist to this recipe was boiling down the maple syrup.  A friend of mine gave me a jar of syrup from his maple trees - he had boiled it down some but still way too thin.  The only advise I would give to this - is make sure to keep an eye on it.  The syrup boiled all over my stove - lots of fun to clean that up.  The syrup was delicious though :)

2 - My other issue was that I put these together at night and baked them in the morning to bring to work.  Do you have any idea how hard it is to drive 45 minutes to work with fresh cinnamon buns in the car - almost impossible.

I did make it to work without even tasting one and my co-workers appreciated it.  They were gobbled up in short order and got lots of complements.  They were very good - loved the banana - just enough for some good banana flavor without being overwhelming - and the maple glaze added just a hint of maple flavor - a very nice combination.

Hopefully will be back posting more soon.  As always - if you you want to check out this recipe or any of the other great Daring Kitchen challenge recipes check them out here.

Friday, December 27, 2013

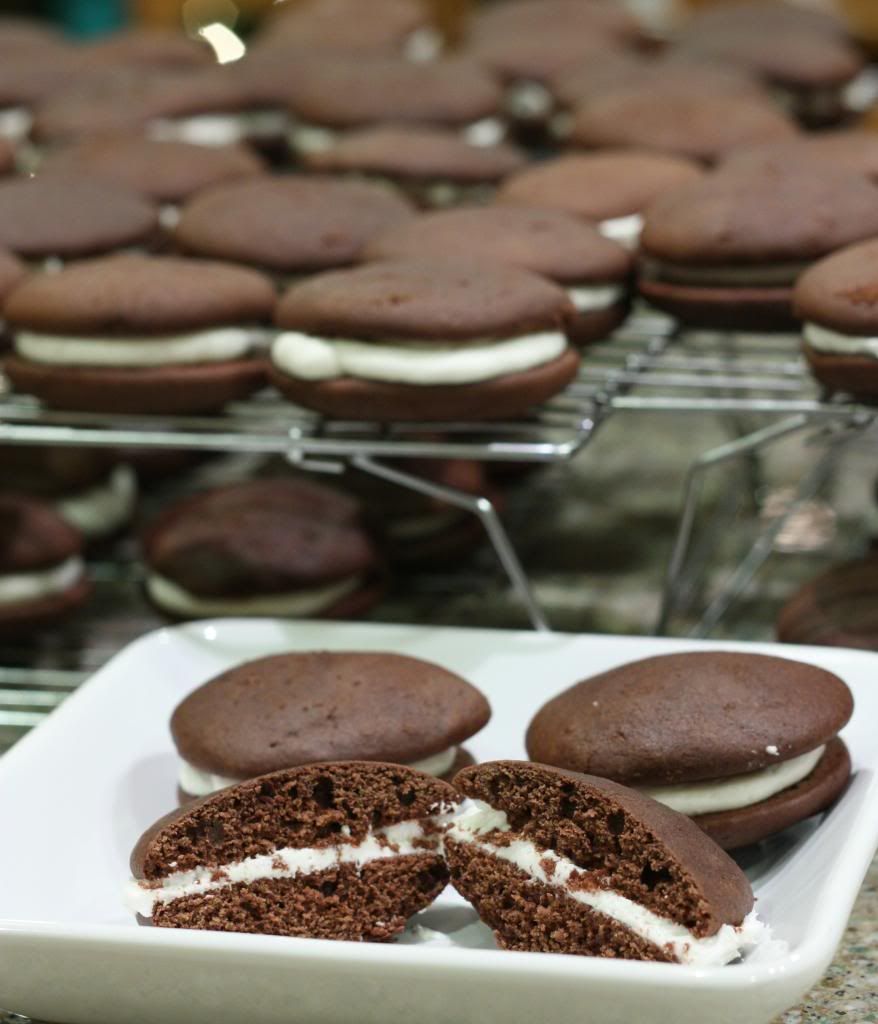
Daring Bakers: Whoopie Pies!


The December Daring Bakers' Challenge had us all cheering - the lovely and talented Bourbonnatrix of Bourbonnatrix Bakes was our hostess and challenged us to make fun, delicious and creative whoopie pies! Delicious little cake-like cookies sandwiching luscious filling in any flavors we chose... What else is there to say but "Whoopie!"

I knew there was something I was supposed to be doing last night.  I made the cookies over a week ago and then forgot to write my post in time - Holiday's are a busy time - especially when you are on a new job with no vacation yet :)

So no creativity here.  I was baking for a cookie exchange so I was thinking more quantity over creativity.  I needed 90 cookies which means I baked four batches which came to around 200 half cookies.  After my first few sets I did run out to grab a small scoop.  Using a spoon was doable but it was much easier with the scoop and I think it made the cookies much more uniform.  

The cookies looked wonderful.  They were mini whoopie pies but still were pretty large for a Christmas cookie.  A full size whoopie pie would be a lot of cookie.  It is hard for me to review these since whoopie pies are not really my favorite cookie.  They were certainly good and if you like whoopie pies these would probably be a good recipe.  For me - I have seen enough whoopie pies to last me a while.


Friday, September 27, 2013

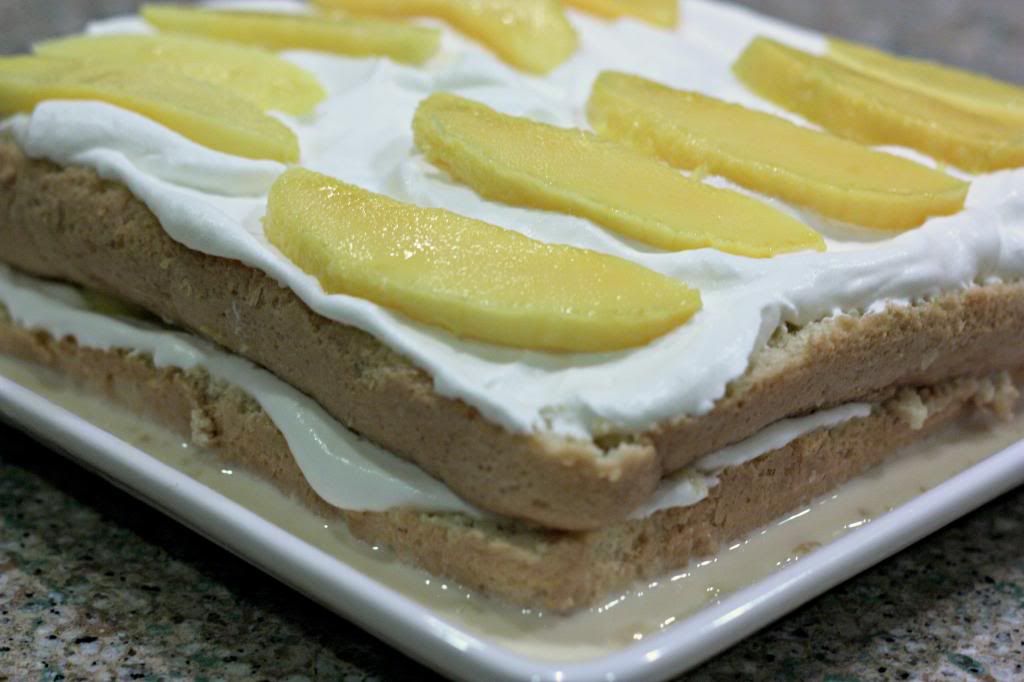
Daring Bakers: Tres Leches Cake


Inma of la Galletika was our Sept. 2013 Daring Bakers’ hostess and WOW did she bring us something decadent and delicious! Pastel de Tres Leches or Three Milk Cake, creamy yet airy, super moist but not soggy.. just plain delish!

Tres Leches cake is something I have had many times, usually at a fancy restaurant, but I have never seen one that looks as incredible as Inma's version.  Any time I have had it, it is a fairly plain affair (not that it is not good plain), but Inma version adds fruit and hers was beautifully decorated.

Inma had a chocolate coconut version of this recipe which sounded incredible, unfortunately I am the only coconut lover in the family so I decided to go for the standard version.  The cake is very easy to make.  The cake is a standard sponge cake, which I sometimes have a little trouble with, but this one came together perfectly.  The tres leche ( or three milk ) sauce was just as easy.  You wouldn't think canned milk could taste so good but combined with a little cream it made a very tasty sauce for the cake.

I have never tres leche with fruit but thought it might go nice with some mango, and I was right.  The cake was really good - as good as any I have had in a restaurant.  I like the cake plain but the mango was a wonderful addition.  The whole family loved the cake as you can see from the picture below :)


Saturday, July 27, 2013

Daring Bakers: Polvitica


In a "celebration" of past Daring Baker and Daring Cook challenges, Lisa (CEO of The Daring Kitchen) challenged all of us to search through the Daring Kitchen archives and pick any one we'd like! The REAL challenge was picking which delicious recipe(s) to try!

Even if it is kind of a non-challenge - what a great challenge.  I almost went back to last months pie challenge that I missed since I really like pie and I really did not want to miss that one.  Looking back though, I found many challenges that I missed or were before I was a member that I wanted to try.  I have no idea why I didn't do this one the first time around but the Povitica from back in October 2011 really caught my eye. The original challenge was from Jenni of The Gingered Whisk.   Povitica is an Eastern European nut bread with many names depending on what country it came from.  It is a sweet bread and usually served around the holidays.

It is not the holidays now but we had a picnic potluck to go to with a bunch of other international adoption parents.  I thought, what better than an international dessert.  While making the dessert I figured out I was out of white flour.  I ended up using  a "white" whole wheat flout and I don't think it hurt it one bit.  Delicious sweet bread with lots of swirly nut goodness.  It was well received at the potluck and the whole family liked it too.

Thanks to Lisa for the challenge and to Jenni for the original challenge.  Check out the challenge recipe and all the other challenges in the Daring Kitchen archives.

Sunday, January 27, 2013

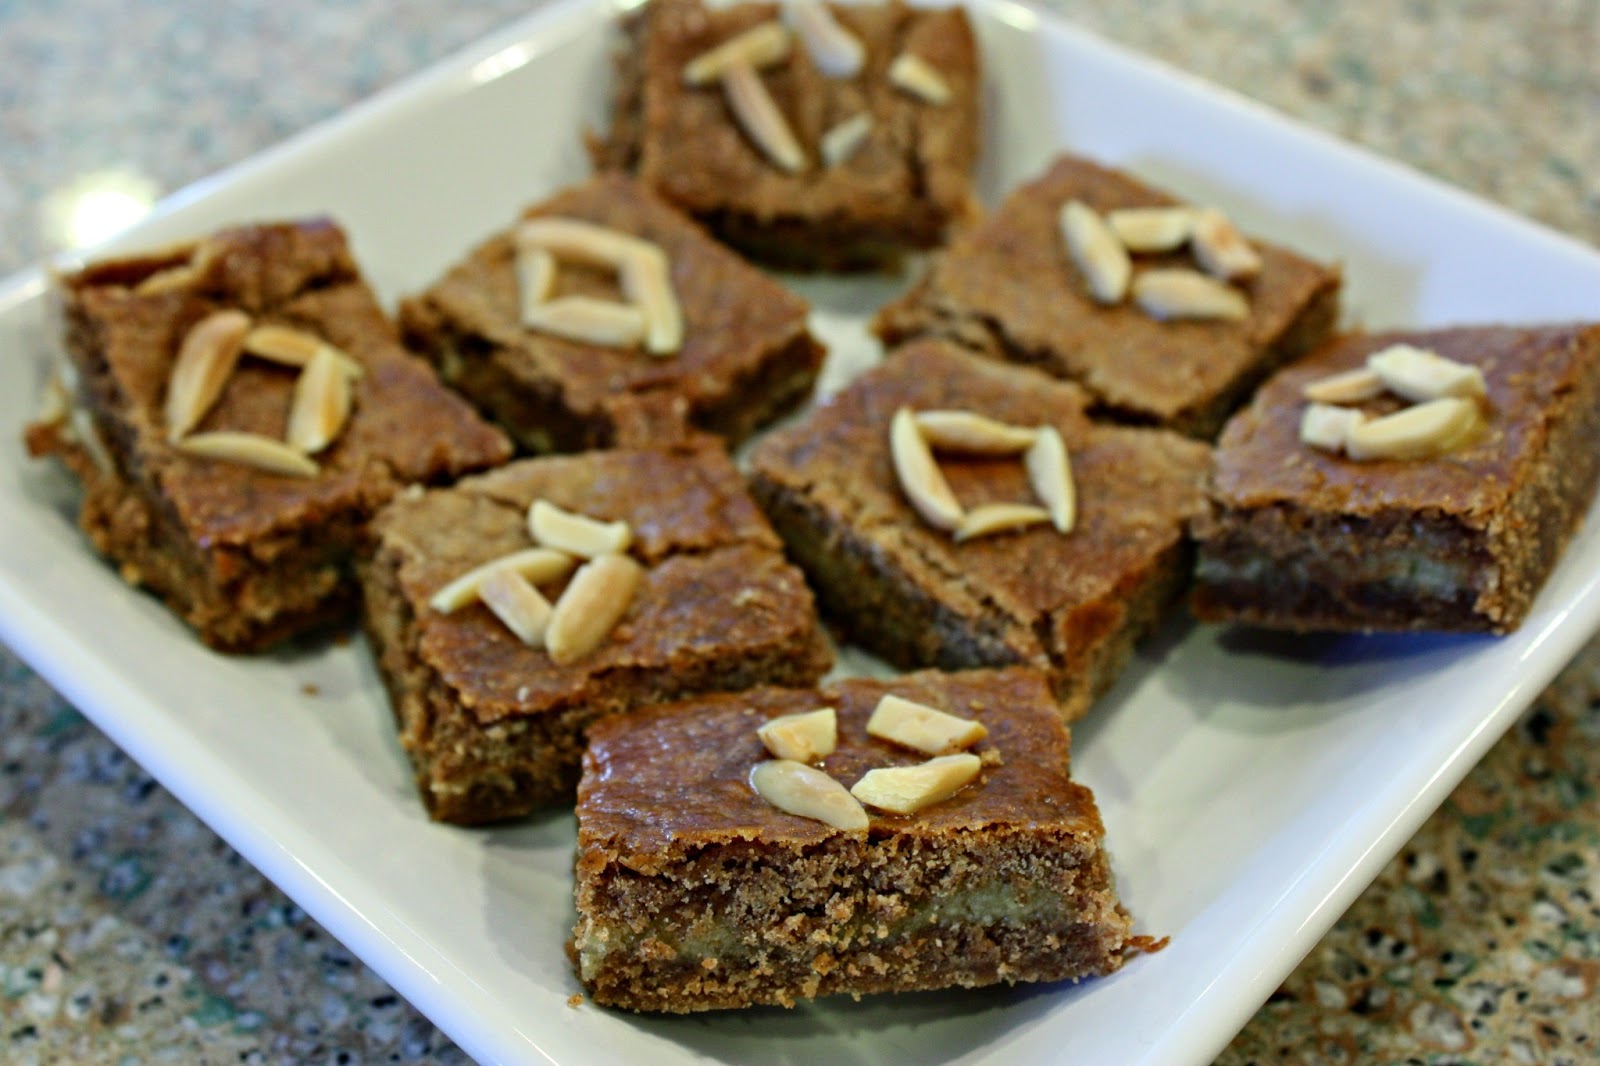
Daring Bakers: Gevulde Speculaas


Francijn of Koken in de Brouwerij was our January 2013 Daring Bakers’ Hostess and she challenged us to make the traditional Dutch pastry, Gevulde Speculaas from scratch! That includes making our own spice mix, almond paste and dough! Delicious!

I have worked with several people from the Netherlands and have even gone to a Dutch themed tulip festival in nearby Pella, Iowa and one thing I have learned is that the Dutch know their treats.  If you don't believe me just try a stroopwafel if you ever get the chance.

In this months challenge Francijn (from the Netherlands) starts out teaching us some Dutch history and all about the spice trade.  The bakers guilds in the Netherlands would create secret spice mixtures and one still used today is known as Speculaas.  It seems like everyone makes it differently (similar to a curry mix) but Francijn gave us some good guidelines to create our very own Speculaas mix.

We also created our own Almond paste and put it all together to make Gevulde Speculaas (or stuffed Speculaas).  When I put this together it did not go together quite as nice as in Francijn's pictures.  There was no way I could get the rolled dough into a pan in one piece.  The good news is that it didn't really seem to matter - I was able to kind of press it together in the pan and after it baked no one would ever know.

The combination of scents  and flavors was amazing.  Lucky this even made it until it was fully baked because it smelled so good in the oven.  I did taste it before it got too cool and it was delicious warm.  Nice and soft with the warm flavors of the spices and the nice sweet almond filling.  Definitely a recipe I will keep for the future - might be something nice to make at Christmas time.  If you would like to try out this recipe you can find it in the Daring Kitchen Archives - join us!

I normally send a bunch of the treats I make to my wife's work so I don't end up eating the entire pan (not that I couldn't do that).  Well this time was a little different.  I live in MN and for those of you that don't know MN gets pretty cold (a few days I woke to -17F or -27C).  One of the crazy things people do here is called the Polar Bear Plunge and this year I decided to do it.  In about two weeks they will be cutting a hole in the ice at a local lake and I will be jumping into it.  It is all for a good cause - we are taking pledges to support Special Olympics MN.  Well I turned my Gevulde Speculaas into a bit of a mini bake sale at my wife's work and took donations for my polar plunge.  I ended up getting $36 in donations.

If you are interested click on the link below.  If it is before Feb 9 it will let you pledge to support Special Olympics MN in my name.  After that date I think it is going to show a picture of how I look after jumping into freezing water - should be interesting.


Thursday, December 27, 2012

Daring Bakers: Panettone


The December 2012 Daring Bakers’ challenge was hosted by the talented Marcellina of Marcellina in Cucina. Marcellina challenged us to create our own custom Panettone, a traditional Italian holiday bread!

I always love the December challenge.  The December challenge always seems to be some traditional Christmas treat and this months challenge did not let me down.  There are probably more variations of a Christmas bread than there are countries and this one comes from Italy.

I started out making the candied orange peels.  I have done this many times now - two years ago for the Daring Bakers Christmas Stollen.  The bread was not difficult but it did take some time.  When you start reading a recipe and it contains seven sub-recipes (sponge, first-dough, second-dough, final dough, candied orange peels, and glaze) and some of the steps have multiple risings; you know it is going to take some time.

The other complication to the recipe is that is traditional cooked in a special paper "pan".  I wasn't sure of a local source and I was too cheap to pay $5 for shipping on a few sheets of paper so I followed Marcellina instructions for making your own.  It was a little bit of a pain and the papers did not look pretty for displaying the finished product, but it worked.

I ended up cooking my bread for 10 minutes longer than the recipe called for and it still came out a bit doughy.  I am cooking a second loaf now and will go even longer on this one.  I also think I followed the recipe by not really mixing the filling in much so the filling was kind of in pockets.  I notice a lot of the other pictures that people have posted show the filing more evenly distributed.  Not really sure which way is "right" - it was good with the pockets of filling but i am sure it would be good with the filling more even too.

I also used double the orange peel like Marcellina suggested as candied citron is expensive.  I made a glaze for mine but didn't follow the recipe.  Some of my family doesn't like the almond so I just made a similar glaze without the almond flour and added a little orange essence.

Even though the center was a little doughy it was still very good and it was a big hit on Christmas morning.  A nice sweet moist bread with a delicious filling.  Thanks for sharing these recipes Marcellina.

Saturday, October 27, 2012

Daring Bakers: Mille-feuille


Our October 2012 Daring Bakers’ challenge was hosted by Suz of Serenely Full. Suz challenged us to not only tackle buttery and flaky puff pastry, but then take it step further and create a sinfully delicious Mille Feuille dessert with it!

You know when you can't pronounce the name of a dessert then it is going to be good.  This Mille-feuille is no exception.  These are also known as Napoleons.

The dessert takes a little while to make but it is not very hard to make and looks very elegant.  The first step is making the puff pastry.  I have made puff pastry before so this was not very different.  The key to puff pastry is all the layers of dough and butter.  It sounds difficult - but isn't.  It does take at least several hours though as there is lots of time in the refrigerator.

The next step is making the pastry cream.  A little stirring but easy to make.  I don't think mine quite thickened enough but not sure.  It oozed a little more than I expected but hard to know - it could be right.  It was good either way.

The pastry and pastry cream get layered together - then comes the tricky part.  You make a royal icing and melt some chocolate for the top and then you need to work quickly.  You quick put the royal icing on, then a thin stream of chocolate, then you use a knife to make the pattern in the top.  You need to do this all in kind of one step since the icing and chocolate both start to set up.  Mine went pretty well.  I used a plastic bag to stream the chocolate on and I cut the hole in the bag a little big so the chocolate was a little wider than desired - but it still looked ok to me.

The hardest part of the whole thing was cutting it after everything had set-up.  The chocolate doesn't really want to cut and the pastry cream wants to ooze.  It came out nice though and tasted delicious.  Nice and flakey pastry and the pastry cream was yummy.  I only wish this was next months recipe since it would work great for the progressive dinner I need to make dessert for.  I'm sure there will be something equally yummy though :)


Thursday, September 27, 2012

Daring Cooks: Empanadas


Patri of the blog, Asi Son Los Cosas, was our September 2012 Daring Bakers’ hostess and she decided to tempt us with one of her family’s favorite recipes for Empanadas! We were given two dough recipes to choose from and encouraged to fill our Empanadas as creatively as we wished!

I have been very busy as of late and I notice that I have missed at least two challenges.  Well time to get back into it.  I will post a picture at the end of the post of what has been keeping me so busy this past month.

When I first heard that we were making Empanadas I thought of small pies that you can pick up and eat filled with beef.  The Empanadas that Patri showed us were a bit different than that.  For one it was much larger - not a single serving size like I was used to.  She also introduced us to many different fillings - some with fish, ham, or beef.

I decided to make a beef filling since I knew that is what my family would like.  I used Patri's recipe but I left out the peppers and added some corn I had.  I also sprinkled about a cup of shredded cheddar cheese over the filling before I put the top on.

It was all very simple to make.  The crust was a yeast crust but only needed one rising.  I rolled it out about as thin as I thought I could without tearing it putting it together.  I think the thickness was perfect - just enough and on the edges where you fold it over you get a nice little extra "bready-ness".  The whole family loved it and asked for seconds.

As always,  if you are interested in this recipe or any of the Daring Kitchen recipes then check out the Daring Kitchen recipe archive here.

At the beginning I promised to show you what has been keeping me busy.  Well I am now a Cooking Dad x 2.  This is Evan.  He has been a great addition to our family but not always a lot of time for cooking right now.


Friday, July 27, 2012

Daring Bakers: Crackers


Our July 2012 Daring Bakers’ Host was Dana McFarland and she challenged us to make homemade crackers! Dana showed us some techniques for making crackers and encouraged to use our creativity to make each cracker our own by using ingredients we love.

Dana gave us several recipes for Crackers and they all looked so good I decided to try all four of them.  I served them at my son's fifth birthday party / picnic and they were a big hit.  It seems like if you tell most people you are making crackers they assume is is something hard - well that could not be further from the truth.  I just made a half batch of each of these and they were all very easy to put together.  In the picture they are from front and clockwise: 1-Cheddar, Rosemary, and Walnut Icebox Crackers, 2-Pepper Jack and Oregano Crackers, 3-Health Crackers, and 4-Seedy Crisps.  I'll just leave you with a few comments on each:

Health Crackers - I used some wheat bran instead of the wheat germ that was called for.  These were hand rolled and I just cut them with a pizza cutter to make nice little squares.  Except for the fact that I salted them a little too much these were very good crackers and they looked like "real crackers" as well.  

Seedy Crisps - Another good one and probably could be called a health cracker too.  I used the pasta maker to roll these because I wanted to try that but it is not really necessary.  Pasta dough is very stiff and hard to get thin; this is not the case with these cracker doughs.  The pasta roller did make them nice and thin and uniform though and I thought these also came out very nice looking.

Pepper Jack and Oregano Crackers - enough of the healthy stuff.  I decided to make this recipe with the pasta roller as well and it was probably a mistake.  The dough was very wet and it would stretch and break a lot in the pasta roller.  I think maybe because of this the dough became a little over-worked and the crackers were not quite as delicate as I would have liked.  Even with that these were my favorite for flavor and they almost looked like a real ritz type cracker.

Cheddar, Rosemary, and Walnut Icebox Crackers - The last type of cracker was a refrigerator cracker.  You just create a log with the dough and slice them off - very simple, very easy.  These weren't really the best looking and they crumbled a lot when eating them but they tasted good.  Nice and buttery and the flavor of rosemary and walnuts was very good.

If you want to try making your own crackers check out the recipes at the Daring Kitchen Recipe Archive.

Wednesday, June 27, 2012

Daring Bakers: Battenberg Cake


This month Mandy of What The Fruitcake?! challenged us to make a  Battenberg Cake. She highlighted Mary Berry’s techniques and recipes to allow us to create this unique little cake with ease.  Well that was the idea anyway - mine was not exactly created with ease.

The first thing you might want to know is what is a Battenberg Cake?  I know I had no idea.  Well Mandy tells us this about the origins of the Battenberg Cake:

The first Battenberg cake was made to celebrate the marriage of Queen Victoria’s granddaughter, Princess Victoria, to husband Prince Louis of Battenberg. It’s traditionally flavored with almond and has the signature Battenberg markings, that is, the yellow and pink squares (said to represent the four princes of Battenberg).

Well Mandy's cakes looked gorgeous and I had high hopes of doing the same.  I had never worked with the marzipan that covers the cake before but I have done fondant cakes which are similar.  My first mistake was waiting too long.  I waited until two days before it was supposed to be done to try making the marzipan.  I tried doing a cooked marzipan recipe that Mandy provided for us.  It seemed easy enough but even when I had added all the liquid that it told us we might not need - the marzipan was still a crumbly, oily mess.

Well I posted on The Daring Kitchen website about my issues and Mandy came to the rescue.  She said I could just blend in a little more water, and if it got too wet I could add some more confectioners sugar.  I added the water and sure enough, I think I added too much.  Problem number 2 - I just ran out of confectioners sugar and I only have two hours before I have to get this done.  Quick cook the cake - no problems there.

Back to the marzipan.  I decided to make my own confectioners sugar.  I put a bunch of sugar in my food processor and process away.  Well I don't seem to be able to get it quite fine enough but I decide to use it anyway to help thicken the marzipan.  The marzipan gets better but I am sure it still wasn't right.  Just not firm enough to work with and it decides to stretch and tear when I try to cover the cake.
 
As for the results.  You can see from the picture it is not spectacular looking.  The marzipan is sagging and probably too thick.  The cake was marvelous - came out perfectly.  The marzipan tasted fabulous - just a tiny bit gritty from too course sugar I used.

This was a fun challenge but I sure need to allow myself more time for this kind of challenge.  I will definitely be taking another shot at marzipan sometime in the future.  If you would like to try making a Battenberg cake you can find the recipe I used along with others at The Daring Kitchen recipe archive.

Friday, April 27, 2012

Daring Bakers: Armenian Nazook


The Daring Bakers’ April 2012 challenge, hosted by Jason at Daily Candor, were two Armenian standards: nazook and nutmeg cake. Nazook is a layered yeasted dough pastry with a sweet filling, and nutmeg cake is a fragrant, nutty coffee-style cake.

I am not sure if I have ever even had Armenian food but for this challenge we got to choose to make one or both of these Armenian sweets.  I would have loved to do both but I have been a little busy lately so I chose to go with the Nazook - it looked good and had a cool name!  The recipe is Jason's Aunt Aida's recipe and he even shared a video of her demonstrating how to prepare the Nazook.

This was real easy to put together.  It is a yeast dough but it never really needs to rise much.  You can put the dough together the night before then it is a snap to put it all together the next day.  The recipe says almost anything goes for fillings - but I chose to just stick with the vanilla filling in the recipe.

I made this for a little appetizer for my Easter dinner.  Kind of a strange appetizer but it was a big hit - everyone loved it.  Kind of crunchy and soft at the same time, and just the right amount of sweet.  Would definitely make this again and maybe be adventurous and try something different for the filling next time.

If you would like to try out the Nazook or the Nutmeg Cake come check out the recipes in the Daring Kitchen Recipe Archive.

Tuesday, March 27, 2012

Daring Bakers: Dutch Crunch Bread


 Sara and Erica of Baking JDs were our March 2012 Daring Baker hostesses! Sara & Erica challenged us to make Dutch Crunch bread, a delicious sandwich bread with a unique, crunchy topping. Sara and Erica also challenged us to create a one of a kind sandwich with our bread!

I had never heard of Dutch Crunch Bread before.  Apparently it is very popular as a sandwich roll in the San Francisco Bay area - I have been there are few times but have not run across this before.  As you can probably guess from the name, this bread originated in the Netherlands where it is known as tijgerbrood or tijgerbol (Tiger Bread) because of its strange appearance.  Well I love good bread and I love a good sandwich so I was all over this challenge.

The bread recipe was mostly a typical bread recipe until it came to the end.  Before you stick it in the oven you mix up a rice batter - like a bread dough recipe but very thin - and spread it on the rolls.  It is one of those recipes where you just have to wonder how someone ever came up with it.  In the oven the rice batter cracks as it dries and gives the bread a very distinct look.

I can't say my bread looked as nice as some of the others doing the challenge but it still looked cool.  Not sure if I would really call it a crunch but the topping does add a different texture and it also adds quite a bit of flavor to the bread as well.  It is also kind of a messy bread to eat as the topping kind of crumbles as you eat it.  I did enjoy it and will make sure to try to find some next time I am in San Francisco to see if what I made is anywhere close to the real thing.

The challenge was to make a unique sandwich with our bread.  Not sure I really made anything unique.  We are having such a beautiful early spring here in Minnesota so I just decided to grill up some chicken breast with Cajun spices and topped it with some avocado, tomato, and lettuce - not anything very original but it was delicious!

If you would like to try making Dutch Crunch Bread yourself check out the recipe titled "Lions, Tigers, and Bears, oh my" in the Daring Bakers Recipe Archive.


Monday, February 27, 2012

Daring Bakers: Pineapple Upside-down Quick Bread


This month on the Daring Bakers our host was our wonderful leader - Lis.  Lisa stepped in last minute and challenged us to create a quick bread we could call our own. She supplied us with a base recipe and shared some recipes she loves from various websites and encouraged us to build upon them and create new flavor profiles.

So it turns out this is going to be another fairly simple challenge like the last few challenges.  I do like these - seeing all the creativity from the other Daring Bakers and Cooks but I have not really been very daring myself - I have just cooked one of the recipes given in the challenge.  It was hard not to do the same this month since Lis gave us some wonderful recipes to try - Pumpkin Bread with Maple Cream Cheese filling sounds especially good to me.  Well - not this time - I decided I was actually going to try to be at least a little daring myself.

I had a few thoughts but finally decided to turn one (or two ) of my favorite cakes into a quickbread.  I have always loved Pineapple upside-down cake and it seemed like a natural.  For a little twist I also added a bunch of toasted coconut to a fairly standard Pineapple upside-down base (or top).  I then used the basic quick bread recipe that Lis gave us - only I added a bunch of chopped pineapple to it.

I have to say I loved it - the cake was nice and soft and moist.  The topping worked great - just like a pineapple upside-down cake - but the addition of the coconut was very good - I love the texture and flavor it added.

Pineapple Upside-Down Quick Bread
Makes one 9" x 5" loaf
Recipe from A Cooking Dad

Ingredients
  • 2 Tablespoons unsalted butter, melted
  • 1/4 cup coconut, toasted*
  • 1/4 cup dark brown sugar
  • 3 slices canned pineapple
  • 3 maraschino cherries
  • 2 cups all-purpose flour
  • 1 cup granulated sugar,
  • 1 teaspoon baking soda
  • 1/2 teaspoon salt
  • 1 cup buttermilk or soured milk*
  • 1 large egg
  • 1/4 cup vegetable oil
  • 1 teaspoon vanilla
  • 1/2 cup coarsely chopped pineapple (approx 3 slices)

Directions
  1. Preheat oven to 350°
  2. Pour melted butter into non-stick 9"x5" loaf pan.  Brush onto sides of pan and allow extra to coat the bottom of the pan.
  3. Sprinkle toasted coconut evenly across the bottom of the loaf pan.  Next sprinkle the brown sugar evenly across the bottom of the pan.  On top of this arrange 3 pineapple slices and place 3 maraschino cherries in the center of the slices. Set pan aside.
  4. Sift flour, salt, sugar, and baking soda into a large bowl.  Make a well in the center and set aside.
  5. Lightly whisk buttermilk or soured milk, egg, oil, and vanilla to combine.  Pour into well and mix into a batter.  Before totally combined add chopped pineapple and mix until just combined.  Batter will still be lumpy and may show a few streaks of flour.
  6. Pour batter into prepared pan.  Bake for 45-50 minutes, or until a cake tester comes out clean.  Cool in pan for 5 minutes, then turn onto plate and remove pan.
Note: To toast coconut - place raw coconut into skillet over medium heat.  Stir frequently until browned (about 3-5 minutes).
Note: To make soured milk, combine 1 cup milk with 1 tablespoon vinegar or lemon juice and let sit for 10 minutes.

Recipe adapted from Sara Schewe - Basic Quick Bread


Friday, January 27, 2012

Daring Bakers : Scones (aka Biscuits)


Audax Artifex was our January 2012 Daring Bakers’ host. Aud worked tirelessly to master light and fluffy scones (a/k/a biscuits) to help us create delicious and perfect batches in our own kitchens!

Anyone who has been cooking with the Daring Cooks or the Daring Bakers knows the name Audax Artifex.  Audax is always extremely helpful to anyone that needs help with anything like ingredient information or techniques.  He is also typically the first to complete a challenge and post about it - many times within hours after we get the challenge recipe.  He is also extremely knowledgeable about food and ingredients and uses that knowledge to come up with some very creative variations on the challenges - many time doing at least three or four versions.  Knowing all of this about Audex I would have guessed that any challenge that he would come up with would be extremely technical and time consuming - something really crazy.  Well, I couldn't be more wrong, for this months challenge he challenged us to make biscuits - a recipe that takes about 20 minutes from start to finish.

Audex is from Austrialia so the first thing he did in the challenge was to explain what they call scones is the same as what we call biscuits in the United States and what we call scones is what they call rock cakes.  My father's side of the family is from Kentucky so I have eaten my share of biscuits - we will see how the Australian version compares.

Audex did challenge us to try a few different batches of biscuits so we could see how different techniques vary the final result (Audex made 16 batches).  Well I waited until the last minute to make these so my intent was to only make one batch.  I decided to just make his base recipe exactly as written.  They were pretty easy to put together, although this is probably the first time I have ever triple-sifted anything.  I only got four 3 inch biscuits (the recipe said five) from the recipe and still the finished result was a little flatter than I was used to.  They were very good biscuits - they could have been a little fluffifer but Audex gave us a lot of ideas on how to fix that - maybe after my 16th batch I would get the exact biscuit I wanted.  I served the biscuits covered with some Chicken Ala King so the slightly heavier biscuit didn't really matter anyway.

The whole family loved the biscuit and after supper my wife says "So are you going to make some more so I can have some more for lunch tomorrow"?  Well I had only planned on making one batch but I jumped at the chance to make a second batch.  I decided to try the buttermilk variation - a version very common in the southern United States.  For some reason with the buttermilk version I got a full five biscuits and I think they still rose higher and fluffier than my first batch.  Not sure if it was because of the different recipe or if my technique changed a little but I think it was an improvement.  I like the taste of the buttermilk biscuits a little better too.  Both batches were nice flaky good tasting biscuits but I have to give the edge to the buttermilk version.  Of course maybe I just liked them better since I ate them Southern Style - covered with honey-butter.  I wish I could test out my technique with 16 batches like Audex but I don't think it would be very good for my waistline.

Thanks to Audex for this months challenge.  Go check out his website Audex Artifex.  If you would like to try out the recipe you can find it in the Daring Kitchen Recipe Archive.


Tuesday, December 27, 2011

Daring Bakers: Letting Nature Do The Work


Our Daring Bakers Host for December 2011 was Jessica of My Recipe Project and she showed us how fun it is to create Sour Dough bread in our own kitchens! She provided us with Sour Dough recipes from Bread Matters by AndrewWhitley as well as delicious recipes to use our Sour Dough bread in from Tonia George’s Things on Toast and Canteen’s Great British Food!

I was a little disappointed when I first saw this months challenge.  I think I was expecting something a little more in tune with the holidays like last years Christmas Stollen.  Well I shouldn't have been disappointed since I have really had enough Christmas snacks to last me a year and this challenge was a lot of fun.

I probably first got into making sour dough when I was in high school.  Probably mostly just because it was fun and interesting - kind of half cooking and half science project.  I don't think I have made it sense then.  I don't really ever really remember making a sour dough bread I liked but I do like good sourdough that others make. Well this was my chance to give it another shot.

I decided to follow Jessica's recipe for the French Country Bread using the wheat starter.  I didn't have a good warm spot for the starter - not easy to find anywhere warm in Minnesota in December.  Because of that I took a little extra time letting the starter grow but in the end it looked and smelled just as it should - lots of bubbles and yeasty smell.  For flour I used King Arthur White Whole Wheat Flour.  Everything seemed to be going great with the bread until I needed to turn it out on the pan.  At this point it seemed to flatten out a lot - not sure if I did anything wrong but it wasn't as high as I wanted it.  I was worried that it was going to be a rock but it actually turned out great.  It was not nearly as dense as I was worried and it tasted fantastic.  It is definitely the best sour dough I have made.  I could have eaten the whole load but I needed some of the loaf for the second part of the challenge.  

Yes - this was a two part challenge.  Not only did we have to make a sourdough starter and bread - we also had to feature the bread in another recipe.  I had some different ideas for what to do but these were dashed when the loaf came out so flat.  I decided to try another of Jessica's provided recipes - Welsh Rarebit.  I have made this before but not well.  This time it was made with the excellent sourdough bread and I picked up some decent Tillamook Sharp Cheddar.  The cheese sauce was delicious.  All we needed for supper was the cheese sauce on toast and a small salad.  It was surprisingly satisfying.

Thanks to Jessica for allowing me to try out sourdough again - it was a lot of fun.  If you would like to try the sourdough or the Welsh Rarebit please check out the Daring Bakers recipe archive - you won't be disappointed.

Sunday, November 27, 2011

Daring Bakers: Filipino Deserts


This months Daring Bakers challenge is Filipino desserts.  The challenge listed two desserts from the Philippines - a cake called Sans Rival and a dessert called Bibingka.  The idea of making a Filipino dessert did appeal to me.  I went to the Philippines several years ago and loved it.   The people there are great and it was one of the best "food" countries I have been too.  They have a wonderful mix of different cultures foods along with their own.  I had a bunch of desserts their but I do not remember seeing either of these.  I wasn't too excited about the Sans Rival since it didn't really look like something I would like and I was thinking of making just the Bibingka - but the challenge said the Sans Rival was the mandatory part of the challenge.  November 14th was my wife's Birthday and the Sans Rival looked better to her that the Bibingka so I decided to go ahead and try it.

I think Sans Rival means without rival in French - kind of a big claim to make.  It is basically just a frosted cake, only layers of meringue are used instead of cake.  I made half a recipe and I also left the nuts out of the filling for my wife.  Other than the fact that it is a little tricky to frost half a round cake - the cake came together very easily.  I wasn't really expecting much from the Sans Rival but it was much better than I thought it would be.  The meringue cake held up well and provided a nice light contrast to the rich buttercream frosting.

I was really looking forward to trying the second dessert, the Bibingka.  As much as I was looking forward to it, I think my wife was the opposite - cheese in  dessert like this did not sound good to her.  The recipe had a few different choices for the topping of the dessert.  The salted egg (an egg left in saltwater at room temperature for several weeks) sounded interesting but I didn't really have time to make it and I was pretty sure if my wife didn't want the cheese there was zero percent chance of getting her to eat salted egg on top.  This was another easy dessert - only a couple of ingredients mixed together and cooked in a ramekin lined with a banana leaf.  The Bibingka was delicious and even my wife agreed.  I would describe it as a cake/custard.  It could be made without the banana leaf but the leaf does give it some flavor and makes for an elegant presentation.

Thanks to Catherine of Munchie Musings for this months Daring Bakers challenge.  If you are interested in either of these recipes you can find them at the Daring Bakers Recipe Archive.

Tuesday, September 27, 2011

Daring Bakers: Croissants


When I read that this months Daring Bakers challenge was croissants I was both excited and a little worried. I was excited because I love croissants and thought it would be a challenge to make.  One of my first real jobs was at McGlynn's bakery - McGlynn's was a large bakery that provided baked goods to supermarkets (they have since been bought by Pillsbury).  The break room at McGlynn's was incredible - it had several rows of bakery cases full of all sorts of baked goods - still warm out of the oven.  I ate too many croissants when I worked there - not a good place to work while on a diet. 

I was a little worried because I did not know much about the making of croissants and assumed it was difficult.  The provided recipe and its 57 steps and 12 hour prep time didn't make it look too simple at first glance either.  Well turns out they are not really that difficult.  Most of the 57 steps are just fold and fold again - then stick in the fridge and wait a while.  I had assumed it would be more like phyllo where you have to roll many paper thin sheets and put butter in between.  A croissant is sort of the same effect - it is made flaky by the many layers of dough separated by butter - but it turns out all the magic happens in the folding technique.  

The croissants do take the better part of a day to make - but not really much hands on time.  They were easy to make - if you can make a pie or bread (and can count to 57) you can make croissants.  I made half plain and the other half I spread some Nutella on before I rolled up.  They were both really good.  Nice and flaky.  If you do make them go ahead and eat them all the same day - they are not nearly as good the next day.

Thanks to Sarah for this months challenge.  I loved the Julia Child video provided - check this out if you want to see Julia make croissants - I don't like coffee but I think even I think I could drink that Café au lait she makes at the end.  If you would like to try out the recipe check out the Daring Kitchen recipe archives here.


Saturday, August 27, 2011

Daring Bakers: Candylicious!


Candy - this months Daring Bakers challenge was to make two different candies. One of the candies must had to be a chocolate candy and the other could be anything. Candy making is one of the things I got into a long time ago - when I was in college I made my first dipped candies. I like candy making since it is kind of cooking and chemistry combined. There is lots of cooking over the stove and watching a thermometer - and it is kind of crucial that you get it pretty exact. Well, since then I have not really done much with the candy making. Not because I didn't enjoy making candy - but because I didn't really need to eat it. Well this challenge gave me a chance to get back into candy making and try some new things.

I have been really busy lately which kind of takes the creativity right out of me - so I just decided to do some of the recipes that were provided to us. I am not really a chocolate person so I decided to make two of the non-chocolate recipes provided and one chocolate candy.

The first candy I decided to make was Pâte de fruit. I do not eat a lot of candy but if I had to pick my favorite it would be those candy orange slices. Pâte de fruit is what those orange slices are trying to copy. I made an orange and a lemon version. They are made with real fruit and real zest and you can tell. The flavor is very real and fresh - not artificial like the ones you buy in the bag. They also are much softer and not as chewy as the ones from the store. They are not hard to make - but they take a lot of stirring. I didn't keep track but think I must have stirred over a hot pan for close to an hour for the two versions - but it was definitely worth it.

I didn't need to make another non-chocolate candy but the recipe for Sponge candy (aka honeycomb aka seafoam) looked kind of fun and easy too. You just throw the ingredients in a pan and wait for it to hit 285 degrees. When it hits temp you take it off the heat and add a bunch of baking soda. As soon as the baking soda is added it foams like crazy and you put it in your prepared pan. For a long time it sits there growing and falling and looking like it is breathing. My four year old loved it. The recipe said I would make a mess cutting it and I did. I have no idea how they got the nicely cut pieces shown in the example. This wasn't really my favorite candy but it wasn't bad. It tasted of baking soda to me and I wonder if the amount could be reduced. Also, this is not the candy to eat if you wear braces.

My last candy was a rolled truffle. Truffles are something that are pretty easy to make - no tempering or anything. You just warm the cream and pour it over chocolate to melt it. When it gets semi-hard you scoop it out and roll it in balls. I added a little bit of grand marnier for flavor. I then rolled some of my truffles in cocoa and some of them into chopped pistachios. Even though I say I am not a big chocolate person these were very good. Nice soft, melt in your mouth, chocolate flavor. The grand marnier added just a hint of orange.

Thanks to Lisa of Parsley, Sage, Desserts, and Line Drives and to Mandy of What the Fruitcake for this months challenge. You can find all the recipes I used in the challenge in the recipe archive at The Daring Kitchen.

Wednesday, April 27, 2011

Daring Bakers: Edible Containers


Wow! What a month. April has been a big, busy month for me - both food-releated and otherwise. We just got done with a fantastic Easter and now I am working on preparing food and a cake for 100 people for a retirement party for my father-in-law - Congrats to him. As you can see from the title the Daring Bakers are doing an edible container just like the Daring Cooks last month. If you haven't already - check out my last post. It was the first I (I think ) Daring Cooks that was kind of a contest, and to my surprise, I am one of the finalists. There was a lot of good competition so it is a big honor for me. If you haven't already, and if it is before May 17, go to The Daring Kitchen and vote at the top of the page.

Now on to this months challenge. This month Evelyne of Cheap Ethnic Eatz challenged us to make an edible container for a maple mousse. Evelyne is from Quebec and gives a very good description of how maple syrup is part of the culture on her blog. Well again I wanted to try to be unique. There are lots of things that go with maple - bacon, nuts, pancakes, squash, sweet potatoes, chocolate - the possibilities are endless. That is part of the reason I am posting this on the last day possible - too many ideas.

The idea I finally settled on was something from my childhood. I grew up in NY and now live in MN - two of the top three maple syrup producers in the US and one of my favorite things as a child was maple sugar candy. If you have never had it - it is just maple syrup and maybe some butter and it is very soft and creamy - just melts in your mouth. I wanted to do the same thing only as a bowl. Easier said than done. I think it took me five tries. The recipes on the internet said to heat to softball stage but I could not get it out of the container without cracking it. I finally ended up using a small silicone measuring bowl for the mold and heating the syrup up close to hard ball stage - it worked like a charm then.

Even though I am crazy about all things maple I thought maybe I needed something else with my maple mousse in a maple bowl. I decided to put small chocolate bowl (not easy either) in the maple bowl and I am using two kinds of mousse. Every month I see someone in the Daring Bakers use Nutella in their challenge so I decided it was now my turn. I thought it would go perfect with the maple.

The results were really good. The maple mousse was really good - a nice maple / buttery taste and smooth texture. I think the texture was much nicer than most mousse I have had. I think the nutella mousse was great too - I am sure my wife liked it better. It had that great nutella flavor and it went very nice with the maple from the mousse and the bowl.

While the maple bowl was not quite as I imagined it - it didn't have that creamy texture of the candies I remember - it still was easy to eat and lots of great maple flavor. I assume the difference in texture was because of having to take it to the higher temperature since my first attempts were much softer.

I'll post my recipe for the Nutella mousse here but if you would like to check out the maple mousse you can find that recipe in the challenge posted here.

Nutella Mousse

Ingredients
  • 1 teaspoon gelatin
  • 1/4-1/2 cup nutella
  • 1 cup heavy cream
Directions
  1. Put 2 tablespoons of cream in a small bowl and sprinkle gelatin over the top. Set aside to soften gelatin.
  2. Whip the remaining cream.
  3. Add nutella a few tablespoons at a time and beat to combine. You can use 1/4-1/2 cup nutella to suit your taste.
  4. Add the cream/gelatin mixture and combine.
  5. Put the mousse into serving bowls and chill until set (about 1-2 hours).

Sunday, March 27, 2011

Daring Bakers: Mets la main à la pâte! Yeasted Meringue Coffee Cake


I had never really heard of a yeasted meringue coffee cake before. It didn't look like any coffee cake I had ever seen, but any cake with chocolate and nuts in it can't be that bad. We were given two different versions of a recipe, one was filled with pecans or walnuts, cinnamon, sugar, and chocolate. The other used cashews, sugar, garam masala, and chocolate. I kind of wish I tried the second version, it sounds good to me, but I decided to play it safe so that my wife would enjoy it more.

I made it using the first version of the recipe with no variations, and using pecans for the nuts. It went together easily. I was a little concerned with how hot the liquid was when I added it to the flour / yeast mixture - I thought it might kill the yeast - but it seemed to rise just fine.

The coffee cake was much different than any coffee cake I have had before. It is much more like a bread than a cake. It was very nice though - not very sweet at all - just a little bit. The chocolate, nuts, and cinnamon were there but they were much more subtle than in a more typical coffee cake. The actual "cake" part was like a moist, slightly sweet bread. I couldn't really tell what the meringue added - I expected to get more texture from it but I think the effect was much more subtle than I expected - I am sure it added to the sweetness though.

The recipe made two small rings (at least it was small compared to the Christmas Stollen we made). My family ate one of the rings and I sent the other to my wife's work where it got many favorable reviews.

This months challenge was presented by two bloggers this month - Jamie of Life's a Feast and Ria of Ria's Collection. If you would like to try to make this months challenge you can find the recipe in the Daring Kitchen Recipe Archive.

On a final housekeeping note I decided to try out Disqus for the blog commenting system. I think I like it but let me know if you like the old comment method better. This system will give the blog threaded comments and would let me respond directly to your comments.