Showing posts with label main dish. Show all posts

Saturday, December 14, 2013

Daring Cooks: Cabbage Rolls


For this months Daring Cook's challenge Olga from Effortnesslessly challenged us to make stuffed cabbage rolls using her Ukrainian heritage to inspire us. Filled with meat, fish or vegetables, flexibility and creativity were the name of the game to get us rolling!

It has been many years since I have had a cabbage roll and I don't know why.  Olga introduced us to some very interesting variations - I didn't even know there was such a thing as a seafood cabbage roll.  I really wanted to try one of these but since it would be my wife and sons first time to try a cabbage roll I figured I should do good old beef this time.

There was nothing hard about making the cabbage rolls but it was several steps and took a couple of hours to complete.  The recipe said it served 8-10 so I decided to cut the recipe in half.  Well even cut in half the recipe made me 20 good sized cabbage rolls - lots of leftovers.  Well it turned out the leftovers were a good thing.  Someone at church just had a baby so we were able to provide them with a nice supper and a few lunches for us.  Everyone enjoyed them - maybe I can get my wife to let me try the seafood version next time.

Sunday, April 14, 2013

Daring Cooks: Chicken Ballotine


For the April Daring Cooks Challenge, Lisa from Parsley, Sage and Sweethas challenged us to de-bone a whole chicken, using this video by Jacques Pepin as our guide; then stuff it, tie it and roast it, to create a Chicken Ballotine.
A Ballotine is one of those things that I had heard about before and just always thought it was one of those insanely difficult things that chefs do to show how talented they are.  I never really thought it was something I would ever do.  Well, I was wrong.  Turns out it is not really that difficult and it makes a pretty delicious chicken.  Some definitions of Ballotine say that it is a de-boned leg but in this challenge we de-bone a whole chicken while essentially leaving it a one piece. 
Instead of going through this step by step with lots of pictures Lisa made the wise decision to make this a video challenge.  Jacques Pepin  has a ten minute video that you can see here that shows the whole process.  In the video I think he says that it should take 5-10 minutes to de-bone a whole chicken.  I think it took me about a half hour but a lot of that time was spent watching the video over and over to make sure I was doing it correctly.  I can honestly say that I think it would take less than ten minutes the next time.  I was very surprised at how easy it was and how little knife-work there was to the whole process.
The nice part of the de-boned chicken is that it gives you a nice big piece of uniform meat that is great for stuffing.  I stuffed mine with a mixture of spinach, bread, and mozzarella cheese.  The video also gives a very nice demonstration of trussing the stuffed chicken.  I also made the sauce/gravy that Lisa gave us the recipe for.
The chicken was fabulous.  It looked very elegant and would be a great recipe for entertaining.  It also tasted great.  I loved the stuffing and couldn't get enough of the sauce.  Now if I ever decide I want to make a Turducken for Thanksgiving I will have the major technique figured out.

Friday, December 14, 2012

Daring Cooks: Shepard's Pie


Our Daring Cooks’ December 2012 Hostess is Andy of Today’s the Day and Today’s the Day I Cook! Andy is sharing with us a traditional French Canadian classic the Paté Chinois, also known as Shepherd’s pie for many of us, and if one dish says comfort food.. this one is it!

Everything sounds delicious in French - doesn't it.  Well the first recipe Andy gave us for Paté Chinois was his family recipe and was very similar to the quick Shepard's pie that I regularly make for a weeknight supper.  It has ground beef, mash potatoes. canned or frozen vegetables.  Well, it seems like Paté Chinois is not quite the same.  It also has a little French Canadian twist,  red wine and creamed corn.  Not sure I have ever seen a recipe with red wine and creamed corn together.

My wife is not a big creamed corn fan so I decided to go with a more tradition Shepard's Pie.  Andy also gave us a recipe for a crock pot Shepard's pie made with lamb and beer.  Since I have never made a "real" Shepard's pie I decided to try this one.

I picked us a nice leg of lamb, unfortunately it was 5 1/2 pounds, about twice as big as I needed.  I decided to take a gamble that we would like it and just make a double batch.  I have a pretty large crock pot so I figured no problem.  Well as I started to put it together and mix all the vegetables and meat, I did not even have a bowl big enough to hold it all.  It definitely would not fit in my crock pot so I pulled out the dutch oven.  It barely fit in my large dutch oven.  The recipe called for 10 hours on low in the crock pot so I cooked mine for 3 hours at 325°F.

I froze about half of the cooked Shepard's pie.  I will be able to just make some potatoes and warm it all up to have it later.  The gamble payed off, because it was yummy.  I (and the rest of the family) will have no problem eating this again.  The meat was very tender and tasty and I pretty much licked the sauce off my plate.  The potatoes are cooked right with everything else so they come out a little brown - maybe don't look the best, but they get all that flavor from cooking with the other veggies and meat.  The only change I might make in the future is to brown the meat on the stove - I think that might add a little color and flavor to the meat.

If you want to check out this recipe or any of the other Shepard's pie recipes Andy gave us they are all posted on The Daring Kitchen recipe archive ( look for Paté Chinois ).


Thursday, September 27, 2012

Daring Cooks: Empanadas


Patri of the blog, Asi Son Los Cosas, was our September 2012 Daring Bakers’ hostess and she decided to tempt us with one of her family’s favorite recipes for Empanadas! We were given two dough recipes to choose from and encouraged to fill our Empanadas as creatively as we wished!

I have been very busy as of late and I notice that I have missed at least two challenges.  Well time to get back into it.  I will post a picture at the end of the post of what has been keeping me so busy this past month.

When I first heard that we were making Empanadas I thought of small pies that you can pick up and eat filled with beef.  The Empanadas that Patri showed us were a bit different than that.  For one it was much larger - not a single serving size like I was used to.  She also introduced us to many different fillings - some with fish, ham, or beef.

I decided to make a beef filling since I knew that is what my family would like.  I used Patri's recipe but I left out the peppers and added some corn I had.  I also sprinkled about a cup of shredded cheddar cheese over the filling before I put the top on.

It was all very simple to make.  The crust was a yeast crust but only needed one rising.  I rolled it out about as thin as I thought I could without tearing it putting it together.  I think the thickness was perfect - just enough and on the edges where you fold it over you get a nice little extra "bready-ness".  The whole family loved it and asked for seconds.

As always,  if you are interested in this recipe or any of the Daring Kitchen recipes then check out the Daring Kitchen recipe archive here.

At the beginning I promised to show you what has been keeping me busy.  Well I am now a Cooking Dad x 2.  This is Evan.  He has been a great addition to our family but not always a lot of time for cooking right now.


Thursday, June 14, 2012

Daring Cooks: Cannelloni


Manu from Manu’s Menu was our Daring Cooks lovely June hostess and has challenged us to make traditional Italian cannelloni from scratch! We were taught how to make the pasta, filling, and sauces shared with us from her own and her family’s treasured recipes!

The first thing Manu did in this months challenge was to set up straight on what cannelloni is and what manicotti is.  In Italy Manu had never even heard of manicotti.  Wikipedia says : “Cannelloni is often erroneously referred to as manicotti (Italian: sleeves) (English pronunciation: /ˌmænɨˈkɒtiː/), which is actually a filled Italian dinner crepe, as opposed to pre-rolled pasta.[1] While manicotti and cannelloni are sometimes used interchangeably in preparing non-traditional versions of some dishes, in traditional Italian cooking cannelloni are made with pasta and manicotti with a specialized crepe pan, and the two have particular uses. Although both terms are plural nouns in Italian, the English term is often construed as singular, particularly when used as the name of the dish.”.  So I guess this means I have probably never made or even had manicotti but I have had cannelloni.

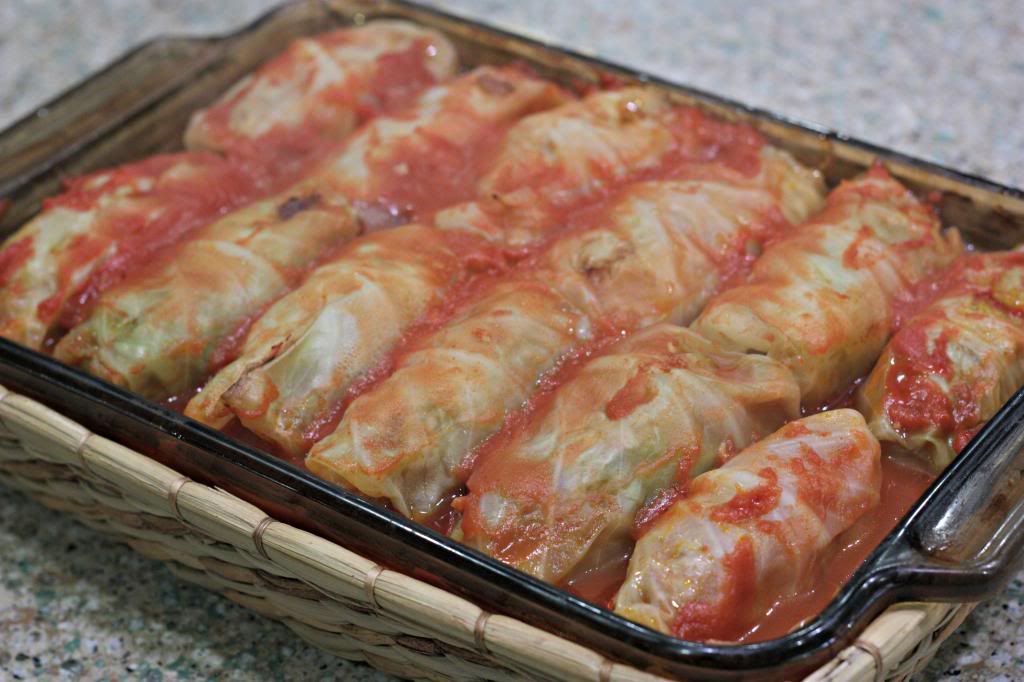
Now that that is straight, I have made cannelloni in the past, but I made it with store bought noodles.  This challenge would give me a chance to make the whole thing from scratch.  I went for the simple "Cannelloni di carne" because that is what I knew my family would like.  The recipe had a bunch of parts but they were all easy to put together.  You have to make the filling, two sauces, and the pasta itself.  The parts were all very simple with only a few ingredients in each.  I think this is the first Italian recipe I have made that did not even require any garlic - not sure how I feel about that.

I do have a pasta machine and I think that probably does make things easier - or at least allow the pasta to be thinner.  The noodles are very thin, much thinner than a store-bought noodle.  They cook in just a minute. You would think they would be delicate being so thin but I had no issues at all working with them - they held a lot of the meat filling without tearing at all.

The results were fantastic.  I don't often make my own pasta but every time I do I think I should do it more often.  The cannelloni noodle was so thin and was almost crepe like.  The filling was just what you would from a real Italian recipe - not too fancy - just good stuff and lots of it.

Now that I have said how easy this was I must confess there was one part that made this a very difficult challenge.  Take a thin floppy long noodle and fill it as full as you can get it with meat and cheese.  Then top with a tomato sauce and on top of that put a white sauce.  It looks beautiful - right?  Now how do you take some of those out and put them on a plate and have them still look beautiful - sauce and cheese everywhere.

Thanks for the challenge Manu and thanks for sharing the family recipes.  If you would like to check out this and the other fillings she recommends you can find them on the Daring Kitchen recipe archive.

Monday, May 14, 2012

Daring Cooks: Boeuf Bourguignon


Our May 2012 Daring Cooks’ hostess was Fabi of fabsfood. Fabi challenged us to make Boeuf Bourguignon, a classic French stew originating from the Burgundy region of France.

I'm going to keep this post a little short since I am in the middle of preparing for a long motorcycle trip this weekend.  I wanted to make sure to get a post out there though since this was so good.

I'll start by saying I have made Boeuf Bourguignon - sort of.  I have a crock pot recipe for burgundy beef and our family enjoys it.  Well Boeuf Bourguignon is not nothing like crock pot burgundy beef.  This was fantastic.  The flavor was way more rich and all the vegetables were perfect since they had not been overcooked with the meat.

I have been cooking for a long time but I don't think I have ever cooked a Julia Child recipe before.  This was a Julia Child recipe and she definitely does it right.  I think I was cooking a few hours straight for this dish.  Nothing was difficult but it was a lot of work.  You brown meat, then finish it in the oven.  You cook most of the other vegetable separately so each of them is done perfectly.  I don't even want to think about how long it took me to peel all those tiny onions.  Finally after cooking everything the sauce is strained and finished separately before putting everything together at the end.

Most times when I have a craving for some burgundy beef I will probably make my crock pot version - but for special occasions this is the way to go.  The extra time involved pays off.

If you would like to try this recipe you can find it at The Daring Kitchen recipe archive.

Tuesday, March 13, 2012

Daring Kitchen: Red Wine Braised Chuck Roast


The March, 2012 Daring Cooks’ Challenge was hosted by Carol, a/k/a Poisonive – and she challenged us all to learn the art of Braising! Carol focused on Michael Ruhlman’s technique and shared with us some of his expertise from his book “Ruhlman’s Twenty”.

I am currently in FL on vacation and trying to type this on my iPad so I will probably be keeping this a little short. I would as thinking I would skip this one since I didn't have much time but when I saw that it was braising I had to do it - everything is good braised. My wife is a big fan of braised short ribs so I was thinking I would do the Michael Ruhlman Red Wine braised short ribs. Well I did a stop at the local supermarket and learned that they didn't carry short ribs. I had a sick kid at home and trying to get ready for vacation so I didn't really want to deal with getting to a meat market for ribs so I decided to fake it. I had a chuck roast in the freezer so I cut the pieces into sort of rib shape pieces ( McRib anyone? ) and just followed the recipe after that.

The recipe was easy to follow. I made the braised meat a day ahead - it is a lot easier to time that way. The only problem with that plan is that you get to smell it cooking all day and then you don't get to eat it right away. The unique thing about the recipe is that you braise it with vegetables to make a nice flavorful sauce but then you throw the veggies away and cook some new vegetables so they are complete mush. I served mine over polenta that I cooked using Alton Brown's Savory Polenta recipe. The polenta was great and it was a very easy recipe since it cooks in the oven. The faux ribs were also a big hit with my wife and myself. Great tasting fall apart meat with a fantastic flavorful sauce and nice tender but not mushy vegetables. I also loved all the mushrooms - it was a lot of mushrooms but I never complain about too many mushrooms.

Wednesday, December 14, 2011

Daring Cooks: Char Sui and Char Sui Bao


Our Daring Cooks’ December 2011 hostess is Sara from Belly Rumbles! Sara chose awesome Char Sui Bao as our challenge, where we made the buns, Char Sui, and filling from scratch – delicious!

Another chance at some Chinese cooking this month.  This is a two part challenge.  First we had to cook the Char Sui (a barbequed pork) and then we use the leftovers to create Char Sui Bao ( a filled bun ).  I love both of these so it sounded like a fun challenge.

The first part of the recipe was making the Char Sui.  It was a very simple recipe.  You simply marinate some pork tenderloin and cook in the oven or on the grill.  Since I am still pretending it is not winter here in Minnesota I decided to grill the pork.  The recipe does tell you to allow the pork to marinate from 4 hours to overnight.  I was only able to do 4 hours.  The pork tasted very good but I do see how it could have benefited from a longer marination time.  I made a bunch of this pork and loved using some of the leftovers for sandwiches.

A few days later I decided to tackle the Char Sui Bao with the leftovers.  The challenge provided recipes for baked or steamed.  I love these little buns but have never had them baked.  Not really sure how authentic a baked bao is but since I didn't really have the equipment to easily steam a bunch I decided to try them baked.  The dough is a yeast dough but only takes a few hours rising time.  They are real simple to put together - just roll out a small circle of dough and use it to wrap a small amount of pork filling.  I loved these - I won't say I liked them better than steamed but they were different - much more like actual bread than a steam bun.  Both good - just in different ways.

This was a great challenge - my only problem is how to get the red color out of my towels and off my cutting boards :)  If you would like to try out these recipes on your own check out the Daring Cooks recipe archive.


Friday, October 14, 2011

Daring Cooks: Moo Shu Pork


This months Daring Cooks challenge was Moo Shu Pork.  I love Moo Shu,  I had made it once in the past but did not make the "pancakes" so it sounded like fun to try to make all the parts.  The challenge even had a recipe for hoisin sauce so I decided to make that as well.

The recipe came together easily.  It is like a lot of Chinese cooking where most of the time is spent preparing and cutting all the ingredients and the actual cooking is a small part of the whole process.  The hoisin recipe was very easy - just mix the ingredients.  The hoisin was much runnier than most I have seen before but it tasted very good.  The ingredients were also much different than a bottled hoisin I had (where the main ingredient was sugar).  For the Moo Shu I did use a standard green cabbage since I had just gotten one from our CSA and I also used a mix of white mushrooms and the black mushrooms.

The most interesting part of the recipe for me was the making of the pancakes.  They are just flour and water but the technique is the interesting part.  I did follow the alternate #2 directions from the recipe.  For the technique you form two small 3" pancakes, then you coat one side with oil, press the two pancakes together and roll them to form one 6" pancake.  You cook this is a dry pan then you separate the two pancakes.  They come right apart where they were oiled and you have two very thin pancakes that are nice and delicate and cooked nicely.  I was a little scared of this technique and my first set or two came out a little thick but after I got the hang of it they were not hard and came out very nice.

Thanks to Shelly of C Mom Cook and Ruth of The Crafts of Mommyhood for this months challenge.  I loved it.  If you would like to follow along and try out this recipe it can be found in the Daring Cooks Recipe Archive.


Sunday, August 14, 2011

Daring Cooks: Appam and Curry (Indian Dinner)

Wow - no posts since June - it has been a busy summer. I feel so guilty for missing the last few months with The Daring Kitchen and I almost missed this one too but this month was a challenge I really wanted to try. The challenge was to make Appams and a South Indian/Sri Lankan dish to go with them. I decided to take it a little further and do a whole Indian meal. Most Indian food that I have eaten has been at Indian restaurant buffets and I have never attempted to cook it myself so I thought this would be a fun challenge. I knew my wife might not enjoy all of this food herself so I gave her the task of finding someone who would. She thought she was going to get an Indian couple from work to come but the schedule did not work. Then she texted me from church all excited because she found out someone there had been to India and were available for a dinner - good - we have two more people willing to test out my Indian cooking.

Since I decided to do a whole meal I had a lot of planning to do. I had just been to a local Indian restaurant so I kind of had an idea of what goes into a meal but was still a little clueless. I sent off an email to an Indian buddy of mine and let him know my requirements and what my ideas were. He was a great help telling me what I was doing that didn't seem right and gave me a few other ideas for what goes together and what to have for a proper Indian dinner. He even offered me some of his Mom's recipes.

I made my first trip to an Indian grocery for this challenge. Going to foreign groceries is always something I love to do and this was no exception. I love seeing all the vegetables and spices and other ingredients that I have never seen before. I picked up some okra, curry leaves, and a few spices that I would need.

Anyway here is the dinner - I won't include any of the recipes because - well because that would be a lot of work for all this stuff - but if you are interested in anything please ask and I will get you the recipe or the link to my source. I will start with the two requirements for The Daring Kitchen challenge. You can find the recipes for the first two items here in the Daring Kitchen recipe archives.


The first item is the Appams. I have had several kinds of Indian bread but don't think I have ever had these. They are a little strange to put together - soaking and grinding raw rice, then add yeast and a very small amount of cooked rice, then 8+ hours of fermenting on the counter. The dough rises and falls all by itself overnight since it is fairly thin. Then when you are ready to cook you thin it out with some coconut milk and cook them one at a time. I figured since they looked kind of like crepes I would cook them in my crepe pan and it worked perfect. They are thin on the edges and more puffy and "bready" in the middle. They were great with the curry and tasted very mild with the texture of a bread. One of our guests just rolled up the curry like a taco - probably not very Indian but it worked.


To go with the Appams I decided to fix one of the dishes included with the challenge - the Malabar Chicken. I did tone down the heat a lot so my wife would at least try it but did leave all the other flavor in. This dish had a lot of herbs and spices that I don't normally cook with but it smelled very good to me. It had a lot of flavors I recognized from Indian food but the dish was different from any curry that I have had before - I think just because it had a lot of tomato. It also had coconut milk but it was not as predominant of a flavor as in a Thai curry.


Now that the Daring Cooks items are out of the way here is the rest of the meal I did. I started the meal with some Eggplant and Onion Pakoras. I actually just went on a food tour of Minneapolis yesterday and part of the food tour was pakoras at an Indian restaurant and they were great. I had an eggplant in the fridge from my CSA and thought it would work for pakoras - I did a quick web search and apparently eggplant pakoras are a thing so I went with it. I also did some onion and cilantro pakoras and they were both very good - I especially liked the onion ones that were kind of a fritter style. They batter is very flavorful with some spices in it and it fried up nice. I also made a Cilantro and mint Chutney - I did add a little heat to the chutney and it was very tasty on the pakoras.


Anyone that has been to an Indian restaurant probably knows this one - a Mango Lassi. Very easy to make and very refreshing on a hot day.


This is a Cucumber Raita. This a very nice summer salad - very similar to some typical American cucumber salads - but with a few extra spices in there.


This is Bhindi Masala ( I think that translates to Okra mixture). I knew okra was African and I knew it was Southern US but I didn't know it was Indian. I am not sure if I have ever had it when it wasn't deep fried but I did enjoy this preparation. It was just onions fried with the okra and a bunch on Indian spices.


For dessert I decided to go with Gajar (Carrot) Halwa. This is just shredded carrot cooked for a long time in milk - then a little bit of sugar and cardamom added. I don't think it is typical but I saw several pictures of it molded like this and I think it made it a nice looking dessert. It was definitely not a typical American dessert - not very sweet or rich but it was kind of nice for a change - mild spice and just a little sweet.

Thanks to Mary from Mary Mary Culinary for this months challenge. It was great fun cooking all this.


Monday, March 14, 2011

Daring Cooks: Papas Rellenas


¡Me Encanta Perú! - that was the name of this past months challenge Daring Cooks challenge - and it means I love Peru. The challenge actually included four separate recipes - we had to make at least one of the main recipes and the rest were optional. We could make Papas Rellenas and/or Ceviche.

The timing of this challenge was perfect. I have been taking a Spanish class for the last few months - don't ask me to say anything in Spanish - my old brain is not picking it up very quickly. Anyway, the class was having a food night this past week where everyone brought a Latin American dish. I asked my Puerto Rican teacher if they have Papas Rellenas in Puerto Rico and she was very excited at the idea of me making them for class.

I pretty much stuck to the recipe in the challenge except I added butter and a little bit of flour to the potatoes - and I left the raisins out of the filling. The recipe was pretty straight-forward. It does take a while to complete because the different components all need time to cool - but everything could be made ahead of time and assembled when it comes time to cook it.

For my class I made a small version of the Rellenas. The small version only took a teaspoon or two of filling. I also made the Salsa Criolla in the challenge. They were a big hit at our dinner. Everyone was asking about them. The real test was my teacher. It passed with flying colors - my teacher went back for seconds, took one home for her husband, and asked for the recipe. She said she had not been able to get a crispy crust like this recipe. One interesting thing she told me was that in Puerto Rico it is common to have some of them made of beef - and some with corned beef. I would really like to try a corned beef version.

I did make a large version a few days later with the left over filling. I was able to put a lot more filling in these. The main thing I noticed with these was - the Salsa Criolla was much better after sitting a few days. The flavors really had time to meld - and they even turned a little pink and looked nicer on the plate.

This was a great first challenge for the Daring Cooks. I look forward to many more. Thanks to Kathlyn of Bake Like A Ninja. Love the name of the blog and her slogan. I need a cool slogan like that - any ideas? The recipes are all included in the pdf challenge here.


Saturday, August 28, 2010

Barefoot Bloggers: Oven-Fried Chicken


This has been a fun month of artery clogging recipes. Starting out with grilled cheese (made extra bad by adding mayonnaise), then on to two desserts, and now we finish it with fried chicken. This gives the illusion of being healthy by saying it is oven-fried, but after looking at the recipe you quickly discover it is anything but healthy.

This was a pretty standard fried chicken recipe with two exceptions. The first is that you soak the chicken overnight in buttermilk. The second is that you pan fry it just to brown the skin, then you finish it in the oven. I am not sure if either of these made for better fried chicken but I would say it was at least as good as other fried chicken I have made. The time in the oven probably does help give the chicken time to drip off some of the oil - so maybe it is a little healthier. You do end up with more dishes with the extra step but it is kind of nice to have time to prepare the rest of your dinner while the chicken is in the oven.

Thanks to Vicki at My Fair Lady for this pick. She added some spices to give the chicken some more flavor - sounds like a good idea to me.

Oven-Fried Chicken
Serves 6

Ingredients
  • 2 chickens (3 pounds each), cut in 8 serving pieces
  • 1 quart buttermilk
  • 2 cups all-purpose flour
  • 1 tablespoon kosher salt
  • 1 tablespoon freshly ground black pepper
  • Vegetable oil or vegetable shortening
Directions
  1. Place the chicken pieces in a large bowl and pour the buttermilk over them. Cover with plastic wrap and refrigerate overnight.
  2. Preheat the oven to 350 degrees F.
  3. Combine the flour, salt, and pepper in a large bowl. Take the chicken out of the buttermilk and coat each piece thoroughly with the flour mixture. Pour the oil into a large heavy-bottomed stockpot to a depth of 1-inch and heat to 360 degrees F on a thermometer.
  4. Working in batches, carefully place several pieces of chicken in the oil and fry for about 3 minutes on each side until the coating is a light golden brown (it will continue to brown in the oven). Don't crowd the pieces. Remove the chicken from the oil and place each piece on a metal baking rack set on a sheet pan. Allow the oil to return to 360 degrees F before frying the next batch. When all the chicken is fried, bake for 30 to 40 minutes, until the chicken is no longer pink inside. Serve hot.

Saturday, June 26, 2010

Father's Day Part 1: Pulled Pork


Seems like I have been slacking off lately but I have been busy. I decided to do some grilling
this father's day. There are a lot of recipes out there for quick pulled pork - this is not one of those. This is as close as I could get to the real thing while still using a gas grill.

This recipe was a lot of fun. It is not difficult at all but it does take some time. It takes six hours after you start cooking - and that doesn't count the time it takes to season the meat. All the time was definitely worth it though. The meat was very tender and very well seasoned. Everyone at the party seemed to like it a lot - several people went for seconds and thirds.

Watch for Father's Day part two where I going to post my father's day dessert.


Pulled Pork
(Source: The new Best Recipe, page 598)
Serves 8

Ingredients
  • 1 bone-in pork roast, preferably Boston butt (6 to 8 pounds)
  • 3/4 cup dry rub for barbecue (recipe posted below)
  • 4 cups wood chips (I used hickory but you could also use mesquite)
  • 2 cups barbecue sauce (use any sauce - my recipe posted below)
Directions
  1. If using a fresh ham or picnic roast, remove the skin ( no need to remove skin on a Boston Butt ). Massage the dry rub into the meat. Wrap the meat tightly in a double layer of plastic wrap and refrigerate for at least 3 hours. For stronger flavor can be refrigerated for up to 3 days.
  2. At least 1 hour before cooking, remove the roast from the refrigerator. Soak the wood chunks in cold water to cover for 1 hour and drain. Place the wood in a smoker box or make one from heavy duty foil pierced with a fork to allow smoke to escape. Place it on top of the primary burner. Turn all burners to high and preheat until the chips are smoking heavily, about 20 minutes. Turn the primary burner down to medium and turn off the other burners. Set the unwrapped roast in a disposable pan over the cool part of the grill, and close the lid. Barbecue for 3 hours. (The temperature inside the grill should be a constant 275 degrees, adjust lit burner as necessary.)
  3. Adjust an oven rack to the middle position and heat the oven to 325 degrees. Wrap the pan holding the roast with heavy duty foil to cover completely. Place the pan in the oven and back until fork-tender, about two hours.
  4. Slide the foil-wrapped pan into a brown paper bag. Crimp the top shut. Let the roast rest for 1 hour.
  5. Transfer the roast to a cutting board and unwrap. When cool enough to handle, "pull" the pork by separating the roast into muscle sections, removing the fat, if desired, and tearing the meat into thin shreds with your fingers. Place the shredded meat into a large bowl. Toss with 1 cup of the barbecue sauce, adding more to taste. Serve, passing the remaining sauce separately.

Dry Rub for Barbecue
(Source: The New Best Recipe, page 579)
Makes about 1 cup

Ingredients
  • 1/4 cup sweet paprika
  • 2 tablespoons chili powder
  • 2 teaspoons ground cumin
  • 2 tablespoons dark brown sugar
  • 2 tablespoons salt
  • 1 tablespoon dried oregano
  • 1 tablespoon granulated sugar
  • 1 tablespoon ground black pepper
  • 1 tablespoon ground white pepper
  • 1-2 teaspoons cayenne pepper
Directions
  1. Mix all the ingredients together in a small bowl. Can be stored in airtight container at room temperature for several weeks.
Basic Barbecue Sauce
(Source: Williams Sonoma Grilling, page 14)
Makes about 2 1/2 cups

Ingredients
  • 2 tablespoons vegetable oil
  • 1 onion, finely chopped
  • 3 cloves garlic, minced
  • 1 1/2 cups catsup or tomato sauce
  • 1/2 cup cider vinegar
  • 1/4 cup Worcestershire sauce
  • 1/3 cup sugar
  • 1 tablespoon chili powder
  • 1/2 teaspoon, more or less, cayenne pepper
Directions
  1. Heat oil in a saucepan over moderate heat and add onion and garlic. Cook gently, stirring, for about 5 minutes.
  2. Add the catsup, vinegar, Worcestershire sauce, sugar, chili powder, and cayenne to taste.
  3. Reduce heat and simmer, partially covered, until the sauce has thickened slightly, about 20 minutes.

Monday, May 3, 2010

Grandma's Enchiladas


Happy Tres de Mayo everyone! Unfortunately we will not be dining at home on the 5th and I was in the mood for Mexican food so I decided to make these up yesterday. I have made them before and I think it is currently my favorite Mexican recipe. With my wife not eating peppers or spicy food, it kind of limits the Mexican food, but this recipe has a lot of good flavor without being overly spicy. I love how you cook the meat until it is fall apart tender and are making the enchilada sauce at the same time in the same pot - way better than any canned sauce.

Grandma's Enchilada's
(Source: Cook's Country October/November, page 27)
Serves 6

Ingredients
  • 3 pounds boneless beef chuck-eye roast, trimmed and cut into 1½ inch cubes
  • 2 tablespoons vegetable oil
  • 2 onions, minced
  • 3 tablespoons chili powder
  • 2 teaspoons ground cumin
  • 2 teaspoons ground coriander
  • 1/4 teaspoon cayenne pepper
  • 4 garlic cloves, minced
  • 2 (15 ounce) cans tomato sauce
  • 1/4 cup red wine
  • 2 cups shredded cheddar cheese
  • 12 (6 inch) corn tortillas

Directions
  1. Adjust oven rack to lower-middle position and heat oven to 300 degrees. Pat beef dry with paper towel and season with salt and pepper. Heat 1 tablespoon oil in large Dutch oven over medium-high heat until just smoking. Cook half the beef, turning occasionally, until well browned all over, about 8 minutes. Transfer to large bowl. Repeat with remaining oil and beef.
  2. Pour off ll but 1 tablespoon of fat from pot. Add onions and 1/2 teaspoon salt and cook over medium heat until softened, about 8 minutes. Stir in chili powder, cumin,coriander, cayenne, and 1/4 teaspoon pepper and cook until spices darken, about 2 minutes. Add garlic and cook until fragrant, about 30 seconds. Stir in tomato sauce and wine and bring to boil.
  3. Add browned beef, along with any juices, to pot. Transfer pot to oven and cook, covered, until meat is fork tender, 2 to 2 ½ hours. Transfer beef to large bowl. Strain sauce through fine-mesh strainer, discarding solids, and set aside. You should have about 2 cups sauce.
  4. Increase oven temperature to 375 degrees. Spread 3/4 cup sauce over bottom of 13 by 9 inch baking dish; set aside. When beef is cool enough to handle, shred into bite-sized pieces. Add 1 cup cheese and additional 1/4 cup sauce and toss to combine.
  5. Spray tortillas on both sides with cooking spray and arrange on baking sheet. Bake until they are warm and pliable, about 1 minute. Place 1/3 cup beef mixture in middle of each tortilla. Roll tightly and arrange, seam-side down, in prepared baking dish.
  6. Pour remaining sauce evenly over enchiladas and sprinkle with remaining cheese. Cover with foil and bake until cheese is melted and enchiladas are heated through, 20 to 25 minutes. Serve.

Thursday, March 11, 2010

Barefoot Bloggers: Individual Meat Loaves


I'm a big fan of meatloaf so I was happy to see this choice. I looked at the recipe though and it seemed like a pretty standard meatloaf. The only thing that seemed a little out of the ordinary was the amount of the onions and the fact that you pre-cook the onions.

After making these I can honestly say I have no idea what people commenting on these are raving about. Not that there was anything wrong with them - they just seemed pretty ordinary to me. Maybe I have spoiled myself but most good meatloaf recipes I have used have more than one type of meat, maybe some bacon, and probably something better than ketchup on top. I am clearly in the minority from what I see in the comments on foodnetwork and the barefoot bloggers that have done this so far. I might make this again in the future and try to dress it up a bit but it is definitely not my favorite meatloaf.

Thanks to Tonya at What's on my Plate for this selection. She has a very varied blog. A lot of vegetarian cooking (obviously not all if she chose meatloaf) and even has an entry on making your own butter.
Individual Meat Loaves
Serves 6

Ingredients
  • 1 tablespoon good olive oil
  • 3 cups chopped yellow onions (3 onions)
  • 1 teaspoon chopped fresh thyme leaves
  • 2 teaspoons kosher salt
  • 1 teaspoon freshly ground black pepper
  • 3 tablespoons Worcestershire sauce
  • 1/3 cup canned chicken stock or broth
  • 1 tablespoon tomato paste
  • 2 1/2 pounds ground chuck (81 percent lean)
  • 1/2 cup plain dry bread crumbs (recommended: Progresso)
  • 2 extra-large eggs, beaten
  • 1/2 cup ketchup (recommended: Heinz)
Directions
  1. Preheat the oven to 350 degrees F.
  2. Heat the olive oil in a medium saute pan.
  3. Add the onions, thyme, salt, and pepper and cook over medium-low heat, stirring occasionally, for 8 to 10 minutes, until the onions are translucent but not brown.
  4. Off the heat, add the Worcestershire sauce, chicken stock, and tomato paste. Allow to cool slightly.
  5. In a large bowl, combine the ground chuck, onion mixture, bread crumbs, and eggs, and mix lightly with a fork. Don't mash or the meatloaf will be dense.
  6. Divide the mixture into 6 (10 to 11-ounce) portions and shape each portion into a small loaf on a sheet pan. Spread about a tablespoon of ketchup on the top of each portion.
  7. Bake for 40 to 45 minutes, until the internal temperature is 155 to 160 degrees F and the meat loaves are cooked through. Serve hot.

Thursday, February 25, 2010

Barefoot Bloggers: Baked Shrimp Scampi


I have a Valentine's day tradition to make a fancy dinner for my wife and I was hoping that this months recipe would be something I could use. Well since my wife doesn't eat shrimp I was a little disappointed at first - this would be another recipe I would not make since it would be only for myself. I thought about it a little more and thought - why not try it with chicken? Even better - why not do chicken and shrimp?

I'm not sure I have ever actually cooked with shrimp. The first thing I discovered was how hard it is to find some nice large shrimp in Minnesota. None of the grocery stores near me seemed to have what I needed so I ended up having to go to Coastal Seafoods - a specialty seafood store that I knew would have them and they did not disappoint.

The scampi was very easy to make. Since I was doing shrimp and chicken I made only a quarter recipe of each and made them in individual gratin dishes. The recipe makes it really easy to make part chicken since the meat really only comes into play at the end. I cut up a chicken breast into pieces about the same size as the shrimp. I even "butterflied" them like the shrimp. I put the chicken in the oven a little earlier since I thought it might take longer but I don't think it was necessary. As you can see from the pictures my shrimp browned a little too much on the top - only because I was busy taking pictures of the chicken and let the shrimp go too long.

The shrimp and the chicken were both terrific. I haven't had good shrimp like that in a long time and they were simple to make. The chicken was good too and my wife and son enjoyed it. Thanks to Jill at Insanely Good Food for this recipe. I have got to try the Mustard Wings she has on her site - they look really good.


Baked Shrimp Scampi
Serves 6

Ingredients
  • 2 pounds (12 to 15 per pound) shrimp in the shell
  • 3 tablespoons good olive oil
  • 2 tablespoons dry white wine
  • Kosher salt and freshly ground black pepper
  • 12 tablespoons (1 1/2 sticks) unsalted butter, at room temperature
  • 4 teaspoons minced garlic (4 cloves)
  • 1/4 cup minced shallots
  • 3 tablespoons minced fresh parsley leaves
  • 1 teaspoon minced fresh rosemary leaves
  • 1/4 teaspoon crushed red pepper flakes
  • 1 teaspoon grated lemon zest
  • 2 tablespoons freshly squeezed lemon juice
  • 1 extra-large egg yolk
  • 2/3 cup panko (Japanese dried bread flakes)
  • Lemon wedges, for serving
Directions
  1. Preheat the oven to 425 degrees F.
  2. Peel, devein, and butterfly the shrimp, leaving the tails on. Place the shrimp in a mixing bowl and toss gently with the olive oil, wine, 2 teaspoons salt, and 1 teaspoon pepper. Allow to sit at room temperature while you make the butter and garlic mixture.
  3. In a small bowl, mash the softened butter with the garlic, shallots, parsley, rosemary, red pepper flakes, lemon zest, lemon juice, egg yolk, panko, 1/2 teaspoon salt, and 1/4 teaspoon of pepper until combined.
  4. Starting from the outer edge of a 14-inch oval gratin dish, arrange the shrimp in a single layer cut side down with the tails curling up and towards the center of the dish. Pour the remaining marinade over the shrimp. Spread the butter mixture evenly over the shrimp. Bake for 10 to 12 minutes until hot and bubbly. If you like the top browned, place under a broiler for 1 minute. Serve with lemon wedges.

Thursday, November 26, 2009

Barefoot Bloggers: Company Pot Roast


I knew I shouldn't have procrastinated on this post. Here I am the night before Thanksgiving and I still didn't have my post that is due on Thanksgiving done. The apple pie is in the oven now so I have a little break to get this done. To everyone else in the US (or even if your not) - Happy Thanksgiving - enjoy the meal.

This post isn't about Thanksgiving dinner though - it is about this weeks Barefoot Blogger recipe - Company Pot Roast. The name of this recipe kind of got me into trouble - my wife decided that it must mean we have to have company over to eat it. That is OK though - gives me a chance to try out a few recipes. I served the pot roast over Ina's rosemary polenta recipe and served a Spiced Pumpkin Cheesecake for dessert.

So how was the pot roast? I would have to say it was very good. It is not really what I am used to since there are not really any identifiable vegetables in it when you serve it. I think that would take a little getting used to for me. That being said - blending all the vegetables into the sauce makes a very tasty gravy - and probably a lot healthier than your standard gravy too. The only question I had on the recipe is - who uses a Prime cut of meat for pot roast? I thought the whole point of pot roast is that is used a little bit of a cheaper cut of meat.

Thanks to Lisa at Lime in the Coconut for this recipe. I haven't had much time to check out her blog yet but it looks like she has some nice photos of her recipes.

Company Pot Roast
Serves 8

Ingredients
  • 1 (4 to 5-pound) prime boneless beef chuck roast, tied
  • Kosher salt and freshly ground black pepper
  • All-purpose flour
  • Good olive oil
  • 2 cups chopped carrots (4 carrots)
  • 2 cups chopped yellow onions (2 onions)
  • 2 cups chopped celery (4 stalks)
  • 2 cups chopped leeks, white and light green parts (2 to 4 leeks)
  • 5 large garlic cloves, peeled and crushed
  • 2 cups good red wine, such as Burgundy
  • 2 tablespoons Cognac or brandy
  • 1 (28-ounce) can whole plum tomatoes in puree
  • 1 cup chicken stock, preferably homemade
  • 1 chicken bouillon cube
  • 3 branches fresh thyme
  • 2 branches fresh rosemary
  • 1 tablespoon unsalted butter, at room temperature
Directions
  1. Preheat the oven to 325 degrees F.
  2. Pat the beef dry with a paper towel. Season the roast all over with 1 tablespoon salt and 1 1/2 teaspoons pepper. Dredge the whole roast in flour, including the ends. In a large Dutch oven, heat 2 tablespoons olive oil over medium heat. Add the roast and sear for 4 to 5 minutes, until nicely browned. Turn and sear the other side and then turn and sear the ends. This should take 4 to 5 minutes for each side. Remove the roast to a large plate.
  3. Add 2 tablespoons olive oil to the Dutch oven. Add the carrots, onions, celery, leeks, garlic, 1 tablespoon salt, and 1 1/2 teaspoons pepper and cook over medium heat for 10 to 15 minutes, stirring occasionally, until tender but not browned. Add the wine and Cognac and bring to a boil. Add the tomatoes, chicken stock, bouillon cube, 2 teaspoons salt, and 1 teaspoon pepper. Tie the thyme and rosemary together with kitchen string and add to the pot. Put the roast back into the pot, bring to a boil, and cover. Place in the oven for 2 1/2 hours, until the meat is fork tender or about 160 degrees F internally. Turn the heat down to 250 degrees F after about an hour to keep the sauce at a simmer.
  4. Remove the roast to a cutting board. Remove the herb bundle and discard. Skim off as much fat as possible from the sauce. Transfer half the sauce and vegetables to a blender or a food processor fitted with the steel blade and puree until smooth. Pour the puree back into the pot, place on the stove top over low heat, and return the sauce to a simmer. Place 2 tablespoons flour and the butter in a small bowl and mash them together with a fork. Stir into the sauce and simmer for 2 minutes, stirring until thickened. Taste for seasonings. Remove the strings from the roast, and slice the meat. Serve warm with the sauce spooned over it.

Thursday, August 27, 2009

Barefoot Bloggers: White Pizza with Arugula


Wow - just got back from a week long trip to visit family in Kentucky. Surprisingly good weather for Kentucky in August and lots of good food. I got my fill of Catfish, Hush Puppies, BBQ, Pies and Cobblers. I even managed to bring back 4 lbs of frozen KY BBQ to last me a little while. Enough talk about that - I am making myself hungry. I made this recipe a few weeks ago before I left so I will do my best to remember it.

The White Pizza with Arugula looked like a great recipe to me but I wasn't sure my wife would like it. I have been experimenting a little with cooking pizza at home (in the oven and on the grill) but my wife isn't a fan of white pizza so I had not done that yet. This was quicker than most pizzas I have made in that it only required 40 minutes for rising time total. It probably only took a little over an hour to make the whole pizza. It does call for a few "exotic" ingredients. I got the fontina - it is an expensive cheese but is a nice melting and tasting cheese so I figured it would be good here. Not fond of goat cheese so I skipped that and used a little feta that I had on hand in place of it. My supermarket did not have arugula so I ended up just getting a bagged spring mix to use in place of that. I made just 1/3 the recipe for two pizzas.

The pizzas were fantastic. When I first made the vinaigrette I was a little worried with how lemony it was but it worked very well on the pizza and wasn't too strong at all. My wife gave it too thumbs up as well. It is a nice meal having the pizza and salad all in one. If you don't like the salad idea I think the pizza would hold up on its own as well - throw some chicken or something on it and it would be great. The crust cooked up very well and my wife even ate all the crust which she does not normally do. I might end up making this my go to crust recipe now.

Thanks to Andrea of Nummy Kitchen for this months recipe. Looks like Andrea does do a lot of "Nummy" baking on her blog.

White Pizza with Arugula
(Source: Back to Basics, Page 82)
Makes 6 pizzas

Ingredients

For the dough:
  • 1 1/4 cups warm (100 to 110) water
  • 2 packages dry yeast
  • 1 tablespoon honey
  • Good olive oil
  • 4 cups all-purpose flour, plus extra for kneading
  • Kosher salt
  • 4 cloves garlic, sliced
  • 5 sprigs fresh thyme
  • 1/4 teaspoon crushed red pepper flakes
For the topping:
  • 3 cups grated Italian fontina cheese (8 ounces)
  • 1 1/2 cups grated fresh mozzarella cheese (7 ounces)
  • 11 ounces creamy goat cheese, such as montrachet, crumbled
For the vinaigrette:
  • 1/2 cup good olive oil
  • 1/4 cup freshly squeezed lemon juice
  • Freshly ground black pepper
  • 8 ounces baby arugula
  • 1 lemon, sliced
Directions

Mix the dough.

Combine the water, yeast, honey and 3 tablespoons of olive oil in the bowl of an electric mixer fitted with a dough hook. When the yeast is dissolved, add 3 cups of flour, then 2 teaspoons salt, and mix on medium-low speed. While mixing, add up to 1 more cup of flour, or just enough to make a soft dough. Knead the dough for about 10 minutes until smooth, sprinkling it with the flour as necessary to keep it from sticking to the bowl.

Knead by hand.

When the dough is ready, turn it out onto a floured board and knead it by hand a dozen times. It should be smooth and elastic.

Let it rise.

Place the dough in a well-oiled bowl and turn it to cover it lightly with oil. Cover the bowl with a kitchen towel and allow the dough to rise at room temperature for 30 minutes.

Make garlic oil.

Place 1/2 cup of olive oil, the garlic, thyme and red pepper flakes in a small saucepan and bring to a simmer over low heat. Cook for 10 minutes, making sure the garlic doesn't burn. Set aside.

Preheat the oven to 500 degrees. (Be sure your oven is clean!)

Portion the dough.

Dump the dough onto a board and divide it into 6 equal pieces. Place the doughs on sheet pans lined with parchment paper and cover them with a damp towel. Allow the dough to rest for 10 minutes. Use immediately, or refrigerate for up to 4 hours.

Stretch the dough.

Press and stretch each ball into an 8-inch circle and place 2 circles on each sheet pan lined with parchment paper. (If you've chilled the dough, take it out of the refrigerator approximately 30 minutes ahead to let it come to room temperature.)

Top the dough.

Brush the pizzas with the garlic oil, and sprinkle each one liberally with salt and pepper. Sprinkle the pizzas evenly with fontina, mozzarella and goat cheese. Drizzle each pizza with 1 tablespoon more of the garlic oil and bake for 10 to 15 minutes, until the crusts are crisp and the cheeses begin to brown.

Make the vinaigrette.

Meanwhile, whisk together 1/2 cup of olive oil, the lemon juice, 1 teaspoon salt and 1/2 teaspoon pepper.

Add the greens.

When the pizzas are done, place the arugula in a large bowl and toss with just enough lemon vinaigrette to moisten. Place a large bunch of arugula on each pizza and a slice of lemon and serve immediately.

TIP Make sure the bowl is warm before you put the water and yeast in; the water must be warm for the yeast to develop.

TIP Salt inhibits the growth of yeast; add half the flour, then the salt, and then the rest of the flour.

TIP To make sure yeast is still "alive," or active, put it in water and allow it to sit for a few minutes. If it becomes creamy or foamy, it's active.

Saturday, December 20, 2008

Barefoot Bloggers: Coq Au Vin


Oh no - it is only my third or forth Barefoot Bloggers post and I have already missed a deadline. The post for Coq Au Vin was supposed to be done the 11th and it is already the 20th. I cooked this on the 12th but have not been able to pull myself together enough for the post until now. Am I the only one that is busy this time of year - I am guessing not. I have now got all my Christmas baking done and got our last Christmas purchase made today so I have a break for a couple of days. Good news is I have already completed the next recipe so I should manage that one on time.

I don't think you can really go wrong with Coq Au Vin. I have made a different version of this for Valentines dinner in the past. It has the good parts of a stew with the carrots and mushrooms and pearl onions cooked in flavorful liquid. The sauce is way better than a stew and I sop up every drop of it with my potatoes and bread. It has been a while since I made a Coq Au Vin so I can't really compare this recipe to it but I can say that this one was very good.

My wife decided that since I was making something semi-fancy that she should take the opportunity to invite someone over. I am not sure it would have been my #1 choice to invite our pastor over on the night I am making a recipe with 1/4 cup Cognac and a half bottle of red wine but that it what she did. I kept tasting it while it was cooking and let it cook until it didn't taste too strong of alcohol. The pastor was our new associate pastor who works mostly with the youth. The pastor and his wife have a daughter about the same age as our 17 month old son so it is fun seeing the two of them together.

The one comment I would make on the recipe is - where do you find these frozen onions? I have never seen frozen onions in the store. I did assume that these were supposed to be pearl onions so I got fresh pearl onions and used those instead and they turned out great. The recipe also said it served three so I threw in a few extra chicken thighs since we were having company and there was still plenty of sauce and veggies for all of the chicken.

Thanks to Bethany of this little piggy went to market... for choosing this months recipe.

Coq Au Vin
Serves 3

Ingredients:
  • 4 ounces good bacon or pancetta, diced
  • 1 (3 to 4-pound) chicken, cut in 8ths
  • Kosher salt and freshly ground black pepper
  • 1/2 pound carrots, cut diagonally in 1-inch pieces
  • 1 yellow onion, sliced
  • 1 teaspoon chopped garlic
  • 1/4 cup Cognac or good brandy
  • 1/2 bottle (375 ml) good dry red wine such as Burgundy
  • 1 cup good chicken stock, preferably homemade
  • 10 fresh thyme sprigs
  • 2 tablespoons unsalted butter, at room temperature, divided
  • 1 1/2 tablespoons all-purpose flour
  • 1/2 pound frozen small whole onions
  • 1/2 pound cremini mushrooms, stems removed and thickly sliced

Directions:
  1. Preheat the oven to 250 degrees F.
  2. Heat the olive oil in a large Dutch oven. Add the bacon and cook over medium heat for 8 to 10 minutes, until lightly browned. Remove the bacon to a plate with a slotted spoon.
  3. Meanwhile, lay the chicken out on paper towels and pat dry. Liberally sprinkle the chicken on both sides with salt and pepper. When the bacon is removed, brown the chicken pieces in batches in a single layer for about 5 minutes, turning to brown evenly. Remove the chicken to the plate with the bacon and continue to brown until all the chicken is done. Set aside.
  4. Add the carrots, onions, 2 teaspoons salt, and 1 teaspoon pepper to the pan and cook over medium heat for 10 to 12 minutes, stirring occasionally, until the onions are lightly browned. Add the garlic and cook for 1 more minute. Add the Cognac and put the bacon, chicken, and any juices that collected on the plate into the pot. Add the wine, chicken stock, and thyme and bring to a simmer. Cover the pot with a tight fitting lid and place in the oven for 30 to 40 minutes, until the chicken is just not pink. Remove from the oven and place on top of the stove.
  5. Mash 1 tablespoon of butter and the flour together and stir into the stew. Add the frozen onions. In a medium saute pan, add the remaining 1 tablespoon of butter and cook the mushrooms over medium-low heat for 5 to 10 minutes, until browned. Add to the stew. Bring the stew to a simmer and cook for another 10 minutes. Season to taste. Serve hot.

Tuesday, October 21, 2008

Maple-Orange Glazed Chicken


I just started a subscription to Cook's Country. I used to subscribe to Cooks Illustrated - which I loved - a great cooking magazine and you can't fail using any of their recipes. Anyway, the same company publishes Cook's Country. I decided to get it for a change. It seemed like it might have more "everyday" recipes. It has a section with 30 minute recipes every month. These are not the kind of 30 minute recipes that have a can of Campbell's soup as the main ingredient, not that there is anything wrong with that occasionally.

Anyway my first magazine just came last week and it has quite a few recipes I want to try. I tried their Beef Stroganoff, a crockpot recipe, last week and it was very good. This week I decided to try the Maple-Orange Glazed Chicken. This was one of the 30 minute recipes and it was very easy to make.

You start out mixing the ingredients for the glaze - just five ingredients. Then you season the chicken breasts and fry them on one side. Then you put them in the oven to cook the rest of the way. When done cooking you take the chicken out and cook up the sauce in the hot pan.

I thought it was kind of silly that the recipe mentioned that the handle on the pan would be hot after it comes out of the oven, duh. Well guess what I did. Unfortunately the recipe didn't mention that the handle is still incredibly hot 3 minutes later after cooking the sauce. Yes - I burnt my fingers pretty good.

The recipe came out good. I wasn't expecting it to be very orangy since the only orange was a small amount of zest. Well it had good orange flavor and nice sweetness from the maple. It was messy and sticky, Lara thought we needed wet naps.

Maple-Orange Glazed Chicken
(Source: Cook's Country October/November 2008)

Serves 4
  • 1/2 cup pure maple syrup
  • 2 teaspoons Dijon mustard
  • 1 teaspoon grated orange zest
  • 1 tablespoon white vinegar
  • 1 teaspoon minced fresh thyme
  • 4 bone-in, skin-on chicken breasts, halved crosswise
  • Salt and pepper
  • 1 tablespoon vegetable oil
  1. Adjust oven rack to middle position and heat oven to 475 degrees. Whisk maple syrup, mustard, zest, vinegar, and thyme in bowl. Pat chicken dry with paper towels and season with salt and pepper.
  2. Heat oil in large oven-proof skillet over medium-high heat until oil is just smoking. Cook chicken skin-side down, until well browned, about 5 minutes. Turn chicken skin side up and transfer chicken to oven. Cook until chicken is deep golden brown and cooked through, about 15 minutes. Transfer chicken to plate and tent with foil.
  3. Wearing oven mitt (pan handle will be very hot), pour off any fat in pan. Add maple mixture and cook over medium heat, scraping up any browned bits with spoon, until thick and syrupy, about three minutes. Season with salt and pepper. Off heat, return chicken to pan and turn until well coated with glaze.