Showing posts with label chicken. Show all posts

Sunday, April 14, 2013

Daring Cooks: Chicken Ballotine


For the April Daring Cooks Challenge, Lisa from Parsley, Sage and Sweethas challenged us to de-bone a whole chicken, using this video by Jacques Pepin as our guide; then stuff it, tie it and roast it, to create a Chicken Ballotine.
A Ballotine is one of those things that I had heard about before and just always thought it was one of those insanely difficult things that chefs do to show how talented they are.  I never really thought it was something I would ever do.  Well, I was wrong.  Turns out it is not really that difficult and it makes a pretty delicious chicken.  Some definitions of Ballotine say that it is a de-boned leg but in this challenge we de-bone a whole chicken while essentially leaving it a one piece. 
Instead of going through this step by step with lots of pictures Lisa made the wise decision to make this a video challenge.  Jacques Pepin  has a ten minute video that you can see here that shows the whole process.  In the video I think he says that it should take 5-10 minutes to de-bone a whole chicken.  I think it took me about a half hour but a lot of that time was spent watching the video over and over to make sure I was doing it correctly.  I can honestly say that I think it would take less than ten minutes the next time.  I was very surprised at how easy it was and how little knife-work there was to the whole process.
The nice part of the de-boned chicken is that it gives you a nice big piece of uniform meat that is great for stuffing.  I stuffed mine with a mixture of spinach, bread, and mozzarella cheese.  The video also gives a very nice demonstration of trussing the stuffed chicken.  I also made the sauce/gravy that Lisa gave us the recipe for.
The chicken was fabulous.  It looked very elegant and would be a great recipe for entertaining.  It also tasted great.  I loved the stuffing and couldn't get enough of the sauce.  Now if I ever decide I want to make a Turducken for Thanksgiving I will have the major technique figured out.

Wednesday, November 14, 2012

Daring Cooks: Brining and Roasting


Audax of Audax Artifax was our November 2012 Daring Cooks’ host. Audax has brought us into the world of brining and roasting, where we brined meat and vegetables and roasted them afterwards for a delicious meal!

This months challenge comes about a month early for us in the USA.  Thanksgiving is just a few weeks away and I will be doing lots cooking on that day - including a brined and roasted turkey.  I am not really complaining though, you can't go wrong with a roast chicken any day of the week.  

I have done this many times but Audax puts flavorings in the brine, while I normally put my garlic and other flavorings under the skin.  I added some garlic and sprigs of thyme to the brine.  For veggies I used potato, sweet potato, cauliflower, and onions.  

The chicken came out wonderful.  Not sure if I will change my method though.  Hard to tell without a side-by-side comparison but I think the under the skin method adds more flavoring.  I have only used brining with poultry but Audax discusses using it with other meats, seafood, and even nuts and seeds.  I will have to experiment a little more.

Saturday, January 14, 2012

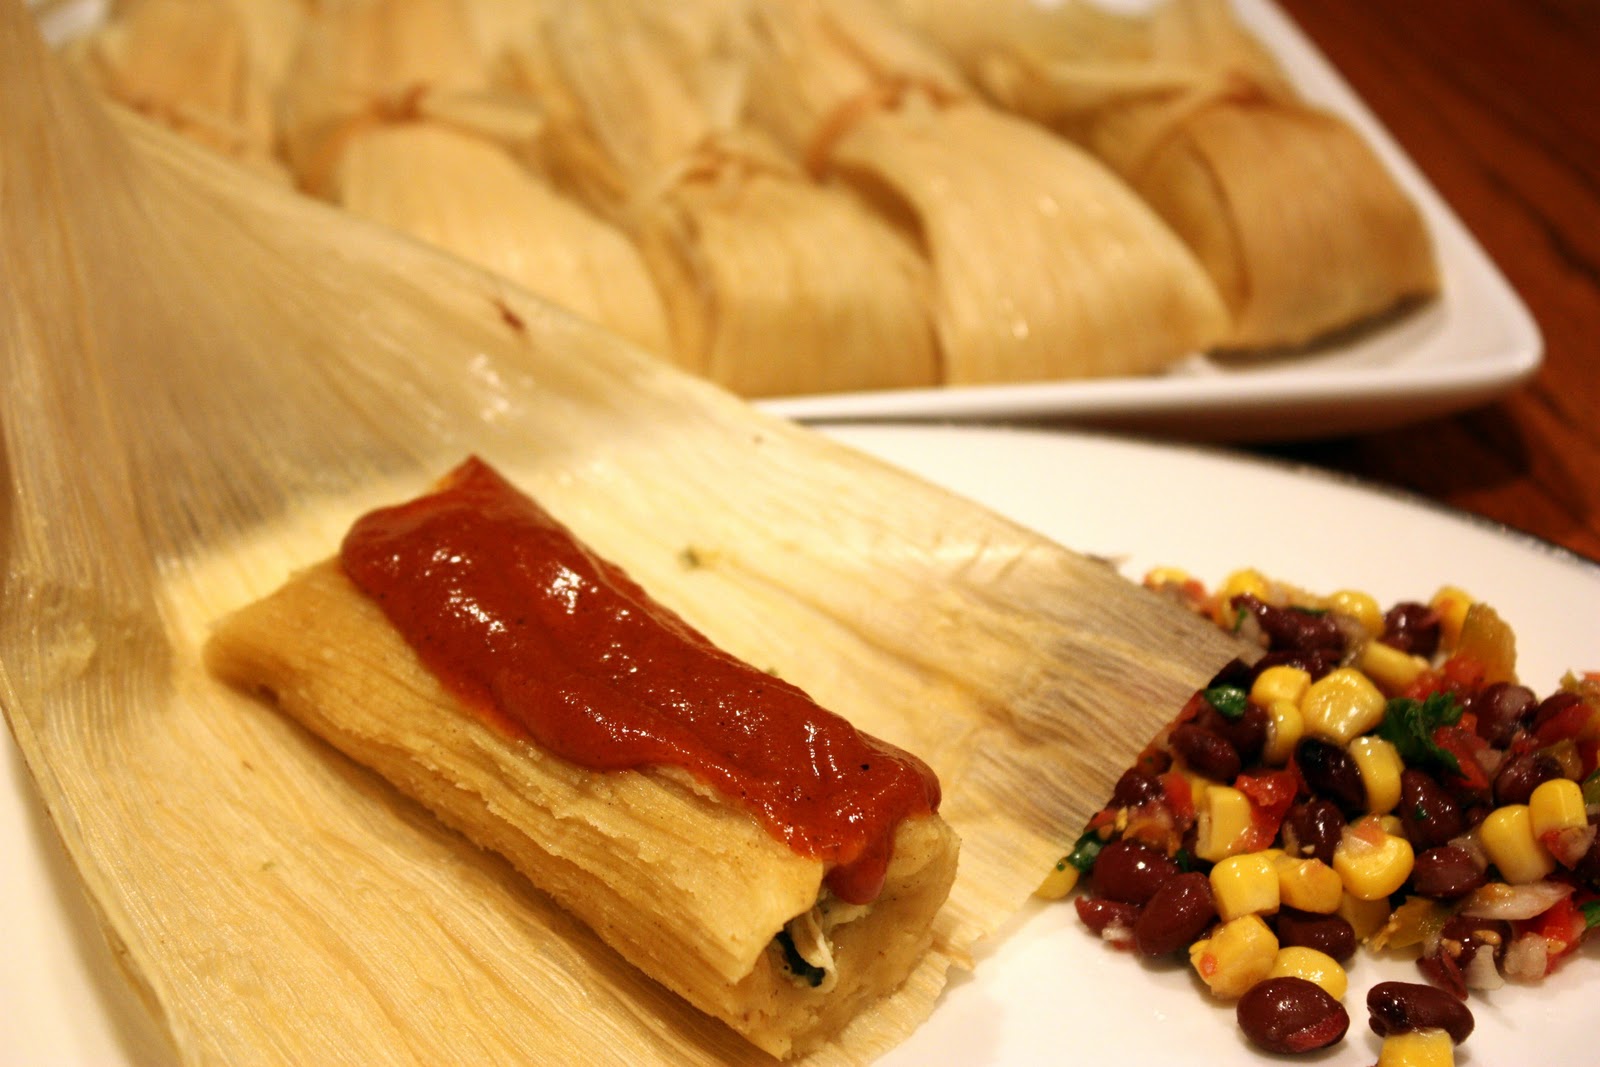
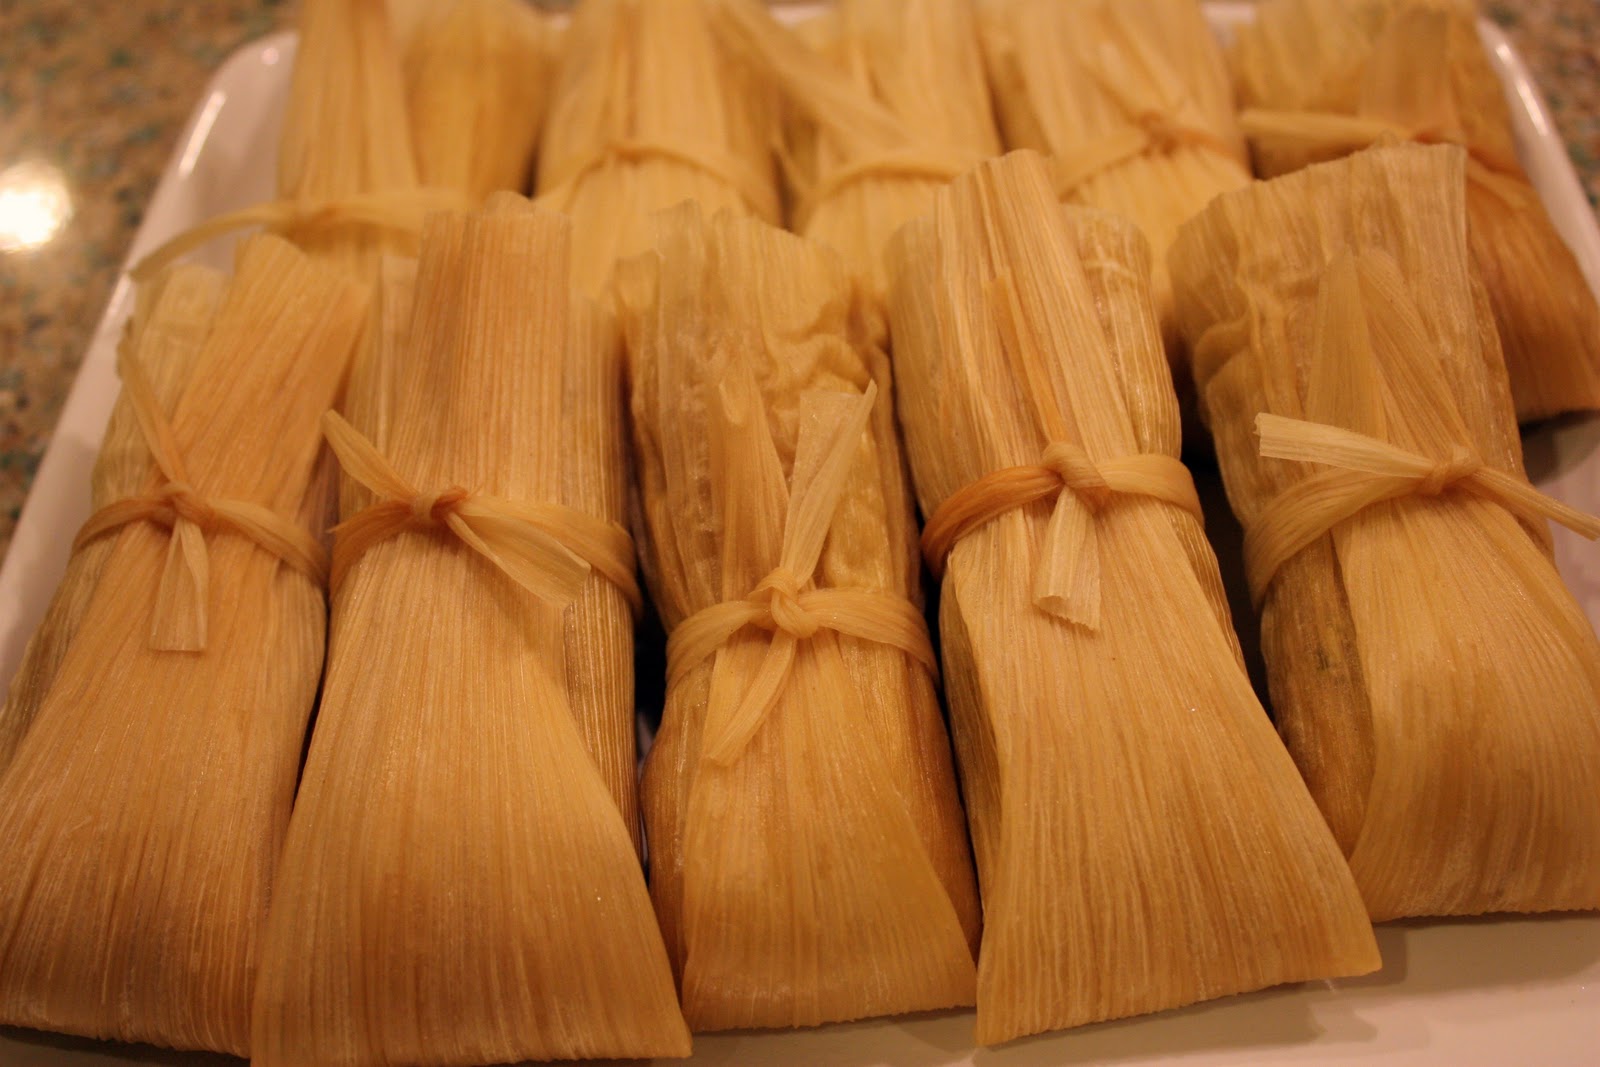
Daring Cooks: Tamales


Maranda of Jolts & Jollies was our January 2012 Daring Cooks hostess with the mostess! Maranda challenged us to make traditional Mexican Tamales as our first challenge of the year!

When I grew up I was not really exposed to a lot of ethnic foods.  There were some Mexican restaurants but at the time they were pretty Americanized and I don't remember ever seeing a tamale on the menu.  I do, however, have fond memories of my dad making tamales.  Well, not really making tamales, but preparing a jar of tamales.  It was kind of a special occasion thing that my dad made just for himself.  I always thought it was very cool - the way they were all individually wrapped in paper.  They took forever to heat up (this was pre-microwave).  I am not sure if I would still think these jarred tamales were any good, but in my memories they were very tasty.  As Miranda says in her description - "Tamales are not so much about the food but about the memories created when making and eating them".

Well now it is not so hard to find a good Mexican restaurant with good tamales so I have them quite often.  I had never tried making them though, so this this looked like a fun challenge.  I am not sure I have ever had chicken tamales but I decided to try out Maranda's recipe for Green Chile Chicken Tamales.  My first mistake was not reading the full recipe (cooking 101).  The ingredients said cooked chicken so I went about roasting a chicken.  After I had that started I checked out the rest of the recipe where it said to boil the chicken.  Oh well, I am pretty sure that roasting can only help.  The rest of the recipe went nice and smooth.  I had always thought tamales were difficult to make and required a lot of technique but it seemed pretty easy to put these together.  I made a simple enchilada sauce to serve on top of the tamales.

I made the tamales for a small family gathering at my mom and dad's on New Years Eve since I thought my dad might enjoy having one.  I was really expecting to bring a bunch home since I didn't think everyone else would eat them but I was very wrong.  They went over very well and got eaten up - I would have loved to brought some home - but it is even better to see others enjoy them.  The tamales were delicious - I can definitely see myself making these again.  My father told me about how his mom used to make tamales.  I had never heard this before and I wish I knew where it came from.  My father's family was from Paducah, KY and I am not quite sure how she would have got into making tamales.  Will have to ask my Grandfather if he knows next time I see him.

If you would like to try your hand making tamales yourself check out the recipe in the Daring Kitchen archives.  Thanks to Miranda for this fun and delicious challenge.


Saturday, August 28, 2010

Barefoot Bloggers: Oven-Fried Chicken


This has been a fun month of artery clogging recipes. Starting out with grilled cheese (made extra bad by adding mayonnaise), then on to two desserts, and now we finish it with fried chicken. This gives the illusion of being healthy by saying it is oven-fried, but after looking at the recipe you quickly discover it is anything but healthy.

This was a pretty standard fried chicken recipe with two exceptions. The first is that you soak the chicken overnight in buttermilk. The second is that you pan fry it just to brown the skin, then you finish it in the oven. I am not sure if either of these made for better fried chicken but I would say it was at least as good as other fried chicken I have made. The time in the oven probably does help give the chicken time to drip off some of the oil - so maybe it is a little healthier. You do end up with more dishes with the extra step but it is kind of nice to have time to prepare the rest of your dinner while the chicken is in the oven.

Thanks to Vicki at My Fair Lady for this pick. She added some spices to give the chicken some more flavor - sounds like a good idea to me.

Oven-Fried Chicken
Serves 6

Ingredients
  • 2 chickens (3 pounds each), cut in 8 serving pieces
  • 1 quart buttermilk
  • 2 cups all-purpose flour
  • 1 tablespoon kosher salt
  • 1 tablespoon freshly ground black pepper
  • Vegetable oil or vegetable shortening
Directions
  1. Place the chicken pieces in a large bowl and pour the buttermilk over them. Cover with plastic wrap and refrigerate overnight.
  2. Preheat the oven to 350 degrees F.
  3. Combine the flour, salt, and pepper in a large bowl. Take the chicken out of the buttermilk and coat each piece thoroughly with the flour mixture. Pour the oil into a large heavy-bottomed stockpot to a depth of 1-inch and heat to 360 degrees F on a thermometer.
  4. Working in batches, carefully place several pieces of chicken in the oil and fry for about 3 minutes on each side until the coating is a light golden brown (it will continue to brown in the oven). Don't crowd the pieces. Remove the chicken from the oil and place each piece on a metal baking rack set on a sheet pan. Allow the oil to return to 360 degrees F before frying the next batch. When all the chicken is fried, bake for 30 to 40 minutes, until the chicken is no longer pink inside. Serve hot.

Thursday, May 27, 2010

Barefoot Bloggers: Grilled Herb Shrimp (Chicken)


It is still spring but it feels like summer here in Minnesota even though it is a month early. This week up to the nineties and very high humidity. Here is a nice summery recipe to kick off the season. We just had a shrimp recipe a few months ago and now we get another one. Last time I actually went and got some shrimp but I was feeling too lazy this time to make two versions for my wife and I so I just made a chicken version of this recipe.

I am sure the shrimp would have been fabulous but I can say that chicken is a great option too. You could probably do at least six breasts with the recipe. This was a great spring/summer recipe with all the fresh herbs - and I love most anything on the grill. This would be a wonderful recipe for a party - easy to prepare ahead of time and it cooks up really quick.

Thanks to Penny at Lake Lure Cottage Kitchen for this recipe pick. In her blog she says she needs a new neighbor across the lake and I might have to start saving now because the lake (and her cottage) looks beautiful from her pictures.

Grilled Herb Shrimp ( or Chicken)
Yields 6 servings

Ingredients
  • 2 pounds large shrimp (16 to 20 per pound), peeled and deveined (see note)
  • 3 cloves garlic, minced
  • 1 medium yellow onion, small-diced
  • 1/4 cup minced fresh parsley
  • 1/4 cup minced fresh basil
  • 1 teaspoon dry mustard
  • 2 teaspoons Dijon mustard
  • 2 teaspoons kosher salt
  • 1/2 teaspoon freshly ground black pepper
  • 1/4 cup good olive oil
  • 1 lemon, juiced
Directions
  1. Combine all the ingredients and allow them to marinate for 1 hour at room temperature or cover and refrigerate for up to 2 days.
  2. Skewer the shrimp. I use 3 or 4 shrimp on a 12-inch skewer for dinner. Heat a grill with coals and brush the grill with oil to prevent the shrimp from sticking. Grill the shrimp for only 1 1/2 minutes on each side.
Note: I leave the tails on when I'm peeling the shrimp. If using chicken use 6 split boneless skinless breast cut in 3/8 inch strips and increase cooking time a little (3-4 minutes per side).

Thursday, March 25, 2010

Barefoot Bloggers: Caesar Club Sandwich


If I had to pick my favorite food a good sandwich has to be high on the list. It is hard to beat a good New York sub or a Bánh mì. Even though I say this a good sandwich like this is something I never make.

I did make a few changes when I put this together. Since I can't ever seem to find arugula I ended up just using some leaf lettuce. Also I knew my wife wouldn't like the sun-dried tomatoes so I left those off as well. I know it would have been better without those changes but I can say that this was a terrific sandwich even with the changes I made. This has to be one of my favorite Barefoot Blogger recipes so far.

Thanks to Karen of Shortbread for this pick - I really liked this one. And check out her blog for lots of southern cooking. I have to try the ham salad recipe she has listed for another sandwich.

Caesar Club Sandwich
Serves 3

Ingredients
  • 2 split (1 whole) chicken breasts, bone in, skin on
  • Good olive oil
  • Kosher salt
  • Freshly ground black pepper
  • 4 ounces thinly sliced pancetta
  • 1 large garlic clove, chopped
  • 2 tablespoons chopped fresh flat-leaf parsley
  • 1 1/2 teaspoons anchovy paste
  • 1 teaspoons Dijon mustard
  • 1 1/2 tablespoons freshly squeezed lemon juice
  • 1/2 cup good mayonnaise
  • 1 large ciabatta bread
  • 2 ounces baby arugula, washed and spun dry
  • 12 sun-dried tomatoes, in oil
  • 2 to 3 ounces Parmesan, shaved
Directions
  1. Preheat the oven to 350 degrees F.
  2. Place the chicken breasts on a sheet pan skin side up. Rub the chicken with olive oil and sprinkle with salt and pepper. Roast for 35 to 40 minutes, until cooked through. Cool slightly, discard the skin and bones, and slice the meat thickly. Set aside.
  3. Meanwhile, place the pancetta on another sheet pan in a single layer. Roast for 10 to 15 minutes, until crisp. Set aside to drain on paper towels.
  4. Place the garlic and parsley in the bowl of a food processor fitted with a steel blade and process until minced. Add the anchovy paste, mustard, lemon juice, and mayonnaise and process again to make a smooth dressing. (Refrigerate the Caesar dressing if not using it immediately.)
  5. Slice the ciabatta in half horizontally and separate the top from the bottom. Toast the bread in the oven, cut side up, for 5 to 7 minutes; cool slightly. Spread the cut sides of each piece with the Caesar dressing. Place half the arugula on the bottom piece of bread and then layer in order: the sun-dried tomatoes, shaved Parmesan, crispy pancetta, and sliced chicken. Sprinkle with salt and pepper and finish with another layer of arugula. Place the top slice of ciabatta on top and cut in thirds crosswise. Serve at room temperature.

Thursday, January 14, 2010

Barefoot Bloggers: Indonesian Ginger Chicken


Well this is exciting! When I first started participating with the Barefoot Bloggers over a year ago I think I was a little over a hundred on the list of bloggers and I thought it would be several years before it was my turn to pick a recipe. For one reason or another people drop out and I am now number 27 of the 114 bloggers in Barefoot Bloggers. That makes it my turn to pick the recipe this month.

I was just talking to a buddy of mine a few weeks ago and he told me that he follows my blog but has never made anything since it all takes too many ingredients. I don't totally agree with that since I know that there have been several recipes that did not have many ingredients, I do know that there have been a fair share of recipes with a lot of ingredients and some hard to find ingredients. That brings me to my pick. I picked Indonesian Ginger Chicken because it looked like it would be good, easy to make, and because it had only five ingredients. So to my buddy - you better make this one - I know they have all this stuff in Switzerland or wherever you live now.

So I just got done saying how easy this recipe looked. I think I was a little overconfident but I tried to make this one twice before today. Last week I was all ready to make it but didn't read the recipe until the day I needed to make it and discovered that it needed to be marinated overnight. Next I decided to make it on this past Monday so thawed my chicken and was ready to make it and discovered that I neglected to buy ginger - who knew I would need ginger for Indonesian Ginger Chicken. That pushed my schedule to today - I almost was late on my own recipe pick.

With all that out of the way it really is easy to make. Takes about 5 minutes prep the night before to prepare the marinade. It marinates in the pan you cook it in so you just pop it in the oven an hour before you need it - flip it half way through and you are done. The chicken looked beautiful - shiny dark skin. It tasted just as good. The skin was crispy and flavored nice with the honey and ginger. I saw a few comments from people that thought some hot pepper flakes or something might have been a nice addition and I agree with them. I think it could have used a little salt too - an unusual thing to need in a Barefoot Contessa recipe.

Indonesian Ginger Chicken
Serves 4 to 6

Ingredients
  • 1 cup honey
  • 3/4 cup soy sauce
  • 1/4 cup minced garlic (8 to 12 cloves)
  • 1/2 cup peeled and grated fresh ginger root
  • 2 (3 1/2 pound) chickens, quartered, with backs removed
Directions
  1. Cook the honey, soy sauce, garlic, and ginger root in a small saucepan over low heat until the honey is melted. Arrange the chicken in 1 layer in a shallow baking pan, skin side down, and pour on the sauce. Cover the pan tightly with aluminum foil. Marinate overnight in the refrigerator.
  2. Preheat the oven to 350 degrees F.
  3. Place the baking pan in the oven and bake for 30 minutes. Uncover the pan, turn the chicken skin side up, and raise the temperature to 375 degrees F. Continue baking for 30 minutes or until the juices run clear when you cut between a leg and thigh and the sauce is a rich, dark brown.

Thursday, April 9, 2009

Barefoot Bloggers: Chinese Chicken Salad


Sometimes the simplest things are the best. This was one of the easier Barefoot blogger recipes but it was also one of my favorites. My wife doesn't like peppers so I substituted about two cups or so of pea pods instead of the pepper. I put the pea pods in with the asparagus in the final minute or so of cooking to give them a quick blanch. I am sure the salad might have looked a little nicer with the red pepper but I think the pea pods were a nice addition. I was a little worried that my wife would not like this one with the Asian flavors but she even went back for seconds. This one is definitely a winner! Thanks to McKenzie at Kenzie's Kitchen for this months pick. Check out McKenzie's blog to see what it is supposed look like with the red peppers.

Chinese Chicken Salad
Serves 12

Ingredients
  • 4 split chicken breasts (bone-in, skin-on)
  • Good olive oil
  • Kosher salt
  • Freshly ground black pepper
  • 1/2 pound asparagus, ends removed, and cut in thirds diagonally
  • 1 red bell pepper, cored and seeded
  • 2 scallions (white and green parts), sliced diagonally
  • 1 tablespoon white sesame seeds, toasted
For the dressing:
  • 1/2 cup vegetable oil
  • 1/4 cup good apple cider vinegar
  • 3 tablespoons soy sauce
  • 1 1/2 tablespoons dark sesame oil
  • 1/2 tablespoon honey
  • 1 clove garlic, minced
  • 1/2 teaspoon peeled, grated fresh ginger
  • 1/2 tablespoon sesame seeds, toasted
  • 1/4 cup smooth peanut butter
  • 2 teaspoons kosher salt
  • 1/2 teaspoon freshly ground black pepper
Directions
  1. Preheat the oven to 350 degrees F.
  2. Place the chicken breasts on a sheet pan and rub with the skin with olive oil. Sprinkle liberally with salt and pepper. Roast for 35 to 40 minutes, until the chicken is just cooked. Set aside until cool enough to handle. Remove the meat from the bones, discard the skin, and shred the chicken in large bite-sized pieces.
  3. Blanch the asparagus in a pot of boiling salted water for 3 to 5 minutes until crisp-tender. Plunge into ice water to stop the cooking. Drain. Cut the peppers in strips about the size of the asparagus pieces. Combine the cut chicken, asparagus, and peppers in a large bowl.
  4. Whisk together all of the ingredients for the dressing and pour over the chicken and vegetables. Add the scallions and sesame seeds and season to taste. Serve cold or at room temperature.

Thursday, March 12, 2009

Barefoot Bloggers: Chicken Piccata


Well here is an interesting problem.  I just got done doing my Valentines day post a little while ago and showed how I made Chicken Piccata.  This month I take a look at the Barefoot Blogger recipes and the first recipe I needed to do was Chicken Piccata.  At first I was a little disappointed but when I thought about it a little more this gives me an opportunity to compare the two while the first recipe was still fresh in my mind.  Chicken Piccata sounds fancy but it is easy and quick enough to make while in a hurry so it is a good recipe to have.

The main difference in the two recipes is the method of coating the chicken breasts.  My first recipe used just a flour coating.  This recipe used a flour coating followed by an egg dip and finally a coating of bread crumbs.  The lemon sauces were almost the same - my first recipe did have some garlic and capers although I left the capers out since my wife does not like them.

And the verdict is...  

I have to say I did like the breaded chicken better - it gave it a little more flavor and some crunchiness.  I think it also looked a little nicer since it browned nice.  I do, however, think I liked the sauce better from the first recipe.  You can never go wrong with a little garlic.  I also think this recipes sauce was a little thin an the lower amount of lemon juice in the first recipe probably helped.

Thanks to Lindsey of Noodle Nights and Muffin Mornings for this recipe.  I think I might be trying out her maple glazed apple cake this weekend.

Chicken Piccata
Serves 2

Ingredients
  • 2 split (1 whole) boneless, skinless chicken breasts
  • Kosher salt and freshly ground black pepper
  • 1/2 cup all-purpose flour
  • 1 extra-large egg
  • 1/2 tablespoon water
  • 3/4 cup seasoned dry bread crumbs
  • Good olive oil
  • 3 tablespoons unsalted butter, room temperature, divided
  • 1/3 cup freshly squeezed lemon juice (2 lemons), lemon halves reserved
  • 1/2 cup dry white wine
  • Sliced lemon, for serving
  • Chopped fresh parsley leaves, for serving
Directions
  1. Preheat the oven to 400 degrees F. Line a sheet pan with parchment paper.
  2. Place each chicken breast between 2 sheets of parchment paper or plastic wrap and pound out to 1/4-inch thick. Sprinkle both sides with salt and pepper.
  3. Mix the flour, 1/2 teaspoon salt, and 1/4 teaspoon of pepper in a shallow plate. In a second plate, beat the egg and 1/2 tablespoon of water together. Place the bread crumbs on a third plate. Dip each chicken breast first in the flour, shake off the excess, and then dip in the egg and bread crumb mixtures.
  4. Heat 1 tablespoon of olive oil in a large saute pan over medium to medium-low heat. Add the chicken breasts and cook for 2 minutes on each side, until browned. Place them on the sheet pan and allow them to bake for 5 to 10 minutes while you make the sauce.
  5. For the sauce, wipe out the saute pan with a dry paper towel. Over medium heat, melt 1 tablespoon of the butter and then add the lemon juice, wine, the reserved lemon halves, 1/2 teaspoon salt, and 1/4 teaspoon pepper. Boil over high heat until reduced in half, about 2 minutes. Off the heat, add the remaining 2 tablespoons of butter and swirl to combine. Discard the lemon halves and serve 1 chicken breast on each plate. Spoon on the sauce and serve with a slice of lemon and a sprinkling of fresh parsley.

Sunday, February 15, 2009

Valentines Day 2009


One of the things I have done most years since Lara and I were married 18 years ago was to make a Valentines day dinner.  I try to make something a little fancy and something Lara will like.  Especially this year with Valentines day on a Saturday I am sure going to a restaurant would be crazy.  

This year I picked something fairly simple to make, I think it still looks elegant though.  For the main dish I made a Chicken Piccata.  It was very easy, and since you pound the chicken into thin cutlets, it cooks very quickly.  The Chicken was good and lemony - it went well with the buttered angel hair pasta (one of Lara's favorites) that I served with it.

I also have been wanting to try my recipe for no-knead bread that was in a cookbook I got for Christmas.  The bread takes hardly any work at all.  You mix the ingredients together the night before - they just get stirred together with a spoon.  You then let it rise overnight on the counter. 
 The next day you knead the dough just 10-15 times (this is the secret step in their "no knead" dough) and let it rise as a ball for another couple hours.  You then cook it in a very hot pre-heated dutch oven and turn the oven down for cooking.  The ingredients were a little different than most bread.  I did not use bread flour, it called for very little yeast, and used a lot of liquid.  I think it came out looking beautiful and tasted even better.  It looked like an "artisan" loaf that you would get at a nice bakery.  My only issue was that it did come out a little dark on the bottom.  I might try lowering the starting temp a little next time.

To end the meal we needed an elegant desert.  Well - I am just going to tease you with that right now since desert was my Barefoot Bloggers recipe for the second half of January.  It was very good and very appropriate for Valentines so check back on January 22 to see how that turned out.

      
Chicken Piccata
(Source: Cuisine at Home sample issue)
Serves 2

Ingredients
  • 2 Boneless, skinless breasts
  • Salt and pepper
  • All-purpose flour
  • Nonstick spray
  • 2 Tbsp. vegetable oil
  • 1/4 c dry white wine
  • 1 tsp. minced garlic
  • 1/2 cup chicken broth
  • 2 Tbsp. fresh lemon juice
  • 1 Tbsp. capers, drained
  • 2 Tbsp. unsalted butter
  • Fresh lemon slices
  • Chopped fresh parsley
Directions
  1. Cut chicken breast lengthwise to form two cutlets each.
  2. Pound the chicken breasts into even 1/4 inch thick cutlets
  3. Season cutlets with salt and pepper, then dust with flour.
  4. Coat saute pan with non-stick spray, add oil, and heat over medium-high.
  5. Saute cutlets 2-3 mins on one side then flip and saute 1-2 minutes with the pan covered.  Transfer cutlets to a warmed platter; pour off fat from pan.
  6. De-glaze pan with wine and add garlic.  Cook until garlic is slightly browned and liquid is nearly evaporated, about 2 minutes.
  7. Add broth, lemon juice, and capers.  Return cutlets to pan and cook on each side 1 minute.  Transfer cutlets to plate.
  8. Finish sauce with butter and lemons.  When butter melts, pour sauce over cutlets.
  9. Garnish with chopped fresh parsley.

Almost No-knead Bread
(Source: Cooks Illustrated, Jan 2008)
Makes 1 Large round loaf

Ingredients
  • 3 cups unbleached all-purpose flour, plus additional for dusting
  • 1/4 teaspoon instant yeast
  • 1 1/2 teaspoon table salt
  • 3/4 cup plus 2 Tablespoons water
  • 1/4 cup plus 2 Tablespoons mild-flavored lager
  • 1 Tablespoon white vinegar
Directions
  1. Whisk flour, yeast, and salt in large bowl.  Add water, beer, and vinegar.  Using rubber spatula, fold mixture, scraping up dry flour from bottom of bowl until shaggy ball forms.  Cover bowl with plastic wrap and let sit at room temperature for 8 to 18 hours.
  2. Lay 12 by 18 inch sheet of parchment paper inside 10 inch skillet and spray with non-stick cook spray.  Transfer dough to lightly floured surface and knead 10 to 15 times.  Shape dough into ball by pulling edges into middle.Transfer dough seam-side down to parchment lined skillet.  Cover loosely with plastic wrap and let sit at room temperature until doubled in size (about 2 hours).
  3. About 30 minutes before baking, adjust oven rack to lowest setting, place 6-8 quart heavy bottomed dutch oven (with lid) on rack, and heat oven to 500 degrees.  Note:  Most dutch ovens come with handles that should not be used in 500 degree oven.  You can get metal handle from Le Creuset or I just used a metal cabinet door handle from Home Depot.
  4. Lightly flour top of dough and, using a razor blade or sharp knife, cut a 6 inch long 1/2 inch deep slit in top of the dough.  Carefully remove pot from oven and remove lid.  Pick up dough using overhanging parchment and lower into the pot.  Cover pot and place into oven.  Reduce temperature to 425 and cook 30 minutes.  Remove lid and continue to bake until deep brown and instant read thermometer reads 210 degrees, 20 to 30 minutes longer.  Carefully remove bread from pot and cool on a wire rack for about 2 hours.

Saturday, December 20, 2008

Barefoot Bloggers: Coq Au Vin


Oh no - it is only my third or forth Barefoot Bloggers post and I have already missed a deadline. The post for Coq Au Vin was supposed to be done the 11th and it is already the 20th. I cooked this on the 12th but have not been able to pull myself together enough for the post until now. Am I the only one that is busy this time of year - I am guessing not. I have now got all my Christmas baking done and got our last Christmas purchase made today so I have a break for a couple of days. Good news is I have already completed the next recipe so I should manage that one on time.

I don't think you can really go wrong with Coq Au Vin. I have made a different version of this for Valentines dinner in the past. It has the good parts of a stew with the carrots and mushrooms and pearl onions cooked in flavorful liquid. The sauce is way better than a stew and I sop up every drop of it with my potatoes and bread. It has been a while since I made a Coq Au Vin so I can't really compare this recipe to it but I can say that this one was very good.

My wife decided that since I was making something semi-fancy that she should take the opportunity to invite someone over. I am not sure it would have been my #1 choice to invite our pastor over on the night I am making a recipe with 1/4 cup Cognac and a half bottle of red wine but that it what she did. I kept tasting it while it was cooking and let it cook until it didn't taste too strong of alcohol. The pastor was our new associate pastor who works mostly with the youth. The pastor and his wife have a daughter about the same age as our 17 month old son so it is fun seeing the two of them together.

The one comment I would make on the recipe is - where do you find these frozen onions? I have never seen frozen onions in the store. I did assume that these were supposed to be pearl onions so I got fresh pearl onions and used those instead and they turned out great. The recipe also said it served three so I threw in a few extra chicken thighs since we were having company and there was still plenty of sauce and veggies for all of the chicken.

Thanks to Bethany of this little piggy went to market... for choosing this months recipe.

Coq Au Vin
Serves 3

Ingredients:
  • 4 ounces good bacon or pancetta, diced
  • 1 (3 to 4-pound) chicken, cut in 8ths
  • Kosher salt and freshly ground black pepper
  • 1/2 pound carrots, cut diagonally in 1-inch pieces
  • 1 yellow onion, sliced
  • 1 teaspoon chopped garlic
  • 1/4 cup Cognac or good brandy
  • 1/2 bottle (375 ml) good dry red wine such as Burgundy
  • 1 cup good chicken stock, preferably homemade
  • 10 fresh thyme sprigs
  • 2 tablespoons unsalted butter, at room temperature, divided
  • 1 1/2 tablespoons all-purpose flour
  • 1/2 pound frozen small whole onions
  • 1/2 pound cremini mushrooms, stems removed and thickly sliced

Directions:
  1. Preheat the oven to 250 degrees F.
  2. Heat the olive oil in a large Dutch oven. Add the bacon and cook over medium heat for 8 to 10 minutes, until lightly browned. Remove the bacon to a plate with a slotted spoon.
  3. Meanwhile, lay the chicken out on paper towels and pat dry. Liberally sprinkle the chicken on both sides with salt and pepper. When the bacon is removed, brown the chicken pieces in batches in a single layer for about 5 minutes, turning to brown evenly. Remove the chicken to the plate with the bacon and continue to brown until all the chicken is done. Set aside.
  4. Add the carrots, onions, 2 teaspoons salt, and 1 teaspoon pepper to the pan and cook over medium heat for 10 to 12 minutes, stirring occasionally, until the onions are lightly browned. Add the garlic and cook for 1 more minute. Add the Cognac and put the bacon, chicken, and any juices that collected on the plate into the pot. Add the wine, chicken stock, and thyme and bring to a simmer. Cover the pot with a tight fitting lid and place in the oven for 30 to 40 minutes, until the chicken is just not pink. Remove from the oven and place on top of the stove.
  5. Mash 1 tablespoon of butter and the flour together and stir into the stew. Add the frozen onions. In a medium saute pan, add the remaining 1 tablespoon of butter and cook the mushrooms over medium-low heat for 5 to 10 minutes, until browned. Add to the stew. Bring the stew to a simmer and cook for another 10 minutes. Season to taste. Serve hot.

Tuesday, October 21, 2008

Maple-Orange Glazed Chicken


I just started a subscription to Cook's Country. I used to subscribe to Cooks Illustrated - which I loved - a great cooking magazine and you can't fail using any of their recipes. Anyway, the same company publishes Cook's Country. I decided to get it for a change. It seemed like it might have more "everyday" recipes. It has a section with 30 minute recipes every month. These are not the kind of 30 minute recipes that have a can of Campbell's soup as the main ingredient, not that there is anything wrong with that occasionally.

Anyway my first magazine just came last week and it has quite a few recipes I want to try. I tried their Beef Stroganoff, a crockpot recipe, last week and it was very good. This week I decided to try the Maple-Orange Glazed Chicken. This was one of the 30 minute recipes and it was very easy to make.

You start out mixing the ingredients for the glaze - just five ingredients. Then you season the chicken breasts and fry them on one side. Then you put them in the oven to cook the rest of the way. When done cooking you take the chicken out and cook up the sauce in the hot pan.

I thought it was kind of silly that the recipe mentioned that the handle on the pan would be hot after it comes out of the oven, duh. Well guess what I did. Unfortunately the recipe didn't mention that the handle is still incredibly hot 3 minutes later after cooking the sauce. Yes - I burnt my fingers pretty good.

The recipe came out good. I wasn't expecting it to be very orangy since the only orange was a small amount of zest. Well it had good orange flavor and nice sweetness from the maple. It was messy and sticky, Lara thought we needed wet naps.

Maple-Orange Glazed Chicken
(Source: Cook's Country October/November 2008)

Serves 4
  • 1/2 cup pure maple syrup
  • 2 teaspoons Dijon mustard
  • 1 teaspoon grated orange zest
  • 1 tablespoon white vinegar
  • 1 teaspoon minced fresh thyme
  • 4 bone-in, skin-on chicken breasts, halved crosswise
  • Salt and pepper
  • 1 tablespoon vegetable oil
  1. Adjust oven rack to middle position and heat oven to 475 degrees. Whisk maple syrup, mustard, zest, vinegar, and thyme in bowl. Pat chicken dry with paper towels and season with salt and pepper.
  2. Heat oil in large oven-proof skillet over medium-high heat until oil is just smoking. Cook chicken skin-side down, until well browned, about 5 minutes. Turn chicken skin side up and transfer chicken to oven. Cook until chicken is deep golden brown and cooked through, about 15 minutes. Transfer chicken to plate and tent with foil.
  3. Wearing oven mitt (pan handle will be very hot), pour off any fat in pan. Add maple mixture and cook over medium heat, scraping up any browned bits with spoon, until thick and syrupy, about three minutes. Season with salt and pepper. Off heat, return chicken to pan and turn until well coated with glaze.

Thursday, October 16, 2008

Chicken with Mushroom Cream Sauce


Lets get this started with a real food post. I have been trying a lot of new recipes since I have been a stay at home dad - a lot of them scrounged from different places on the web. This one is from the Simply Recipes blog.

The recipe is pretty simple. You start with a pretty standard pan fried chicken. You then put the chicken into a roasting pan and pour some broth over it and stick it in the oven for 40-50 minutes. I think the oven time is only so you have time to make the pan sauce - otherwise it would be good if the chicken was just cooked in the pan. I did make a modification to the recipe since 40-50 minutes sounded awfully long after being cooked on top of the stove. Perhaps I browned on top of the stove longer than the recipe intended, but my chicken was done at 25-30 minutes.

The recipe also mentioned using a rich chicken broth over the chicken - even describing how to make one quickly with the giblets. I normally do have some homemade chicken broth around but I am currently out. I used some low-sodium canned broth. I would not use canned broth where it is the major component of a recipe but in this recipe I hardly think it mattered.

The pan sauce was nice and easy. You save 2 Tablespoons oil from cooking the chicken and fry up some onions, garlic, and mushrooms. Then add sour cream and cream. I made a few changes here as well. The recipe has you remove your garlic at the end. I just ran my garlic through a press and there is no need to remove it at the end. I also did not have cream but used half & half instead. I was still plenty rich and creamy - I think you could probably even use milk with good results to save a few more calories.

The final results were very good. The sauce was very flavorful and rich. The recipe makes a lot of sauce so make sure to serve with potatoes or noodles or something. We had it with mashed potatoes.

I just made Beef Stroganoff the other day and my wife Lara wanted it without sour cream. She is not real adventurous with food so recipes can be difficult to adapt at times. I made her try some with sour cream but she thought it was too "tangy". With this recipe I decided to make it with the sour cream and not tell her (is that wrong?). Well she took seconds of both the chicken and mashed potatoes and put sauce on both. She said the sauce was really good. When I asked her if the sauce was too "tangy", I think she got the hint - the sauce is 50% sour cream.

Chicken with Mushroom Cream Sauce
(Source: Simple Recipes)

Ingredients

  • 1 5-pound roasting chicken, cut into serving pieces (bone-in, skin on)
  • Flour, salt and pepper
  • 1 cup grapeseed oil, or canola oil (or other high smoke point oil)
  • Butter
  • 1/4 cup rich chicken broth
  • 1 small onion, chopped
  • 1/2 pound fresh mushrooms, sliced
  • 1 clove of garlic, crushed
  • 1/2 cup sour cream
  • 1/2 cup heavy cream
  • Salt and pepper
Method

  1. Put a cup of flour, a teaspoon of salt and half a teaspoon of pepper in a brown paper bag. Piece by piece, put a piece of chicken in the bag and shake to coat the chicken with flour mixture.
  2. Preheat the oven to 350°F. On the stove top, in a large frying pan, heat oil to medium high heat. Place the chicken pieces in the pan. Watch the oil carefully, you don't want the oil to be so hot as to burn the chicken, you just want to lightly brown it. Brown the chicken pieces on all sides, turning when necessary.
  3. Butter a roasting pan generously. Arrange the chicken pieces in it, pour broth over it, and bake at 350°F until the chicken is tender and cooked, about 40-50 minutes for pieces from a 5-pound chicken. (See my note above 40-50 minutes may be too long). You know that the chicken is done by poking a thigh with a meat fork (the thigh meat is dark meat and takes longer to cook than white breast meat). If pink or red juice runs out of the hole made by the fork, the chicken is not done. If only clear juice runs out, the chicken is done.
  4. About 20 minutes before the chicken is expected to be done, start cooking the onions and mushrooms. In the same frying pan as was used to cook the chicken, empty the pan of all but 2 Tbsp of oil. Add the onions to the pan and saute on medium heat until softened. Add the crushed garlic clove and the mushrooms and cook until mushrooms are no longer crisp. Remove and discard the garlic, and add the sour cream and the heavy cream to the onions and mushrooms. Lower the heat. Keep warm, but do not boil. Salt and pepper to taste.
  5. When the chicken is done, remove from oven. Serve on a platter with the mushroom sauce spooned over it, or served on the side.
Serves 6 to 8.

Serve with noodles, rice, or Spanish rice.